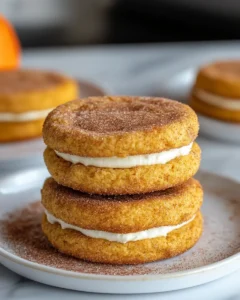
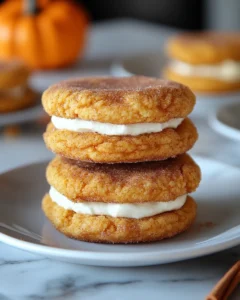
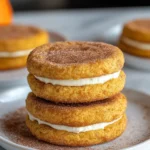
There’s something undeniably comforting about the scent of cinnamon, nutmeg, and warm pumpkin wafting through the kitchen on a cool autumn day. These Pumpkin Snickerdoodle Cookie Sandwiches capture the essence of the season in every bite — soft, chewy, and perfectly spiced cookies hugging a luscious pumpkin cream filling. Imagine sitting by the window as the leaves change color, holding one of these golden cookie sandwiches and savoring the taste of fall.
This recipe was inspired by the timeless love for snickerdoodles — those cinnamon-sugar classics that never fail to please — but with a cozy autumn twist. The addition of pumpkin purée and seasonal spices turns this familiar favorite into a festive treat that’s perfect for Thanksgiving gatherings, cozy family movie nights, or holiday dessert platters. Each bite is a warm hug of nostalgia and fall flavor, making them an irresistible dessert for anyone who loves pumpkin spice season.
Why You’ll Love These Pumpkin Snickerdoodle Cookie Sandwiches
-
Soft and chewy perfection: The cookies bake up tender and moist, thanks to the pumpkin purée and brown sugar.
-
Deliciously spiced: A blend of cinnamon, nutmeg, and a hint of ginger delivers that unmistakable fall aroma.
-
Creamy filling: The smooth pumpkin cream adds sweetness and balance to the spice, creating an irresistible contrast in texture.
-
Perfect for gatherings: These cookies look bakery-worthy and make a standout addition to holiday dessert tables or fall bake sales.
-
Freezer-friendly: You can make them ahead and store them for later — ideal for busy holiday schedules.
Ingredients
For the Pumpkin Snickerdoodle Cookies
-
2 ¾ cups all-purpose flour
-
1 teaspoon baking soda
-
2 teaspoons cream of tartar
-
½ teaspoon salt
-
2 teaspoons ground cinnamon
-
½ teaspoon ground nutmeg
-
¼ teaspoon ground ginger
-
1 cup unsalted butter, softened
-
¾ cup granulated sugar
-
½ cup light brown sugar, packed
-
⅓ cup pumpkin purée (not pumpkin pie filling)
-
1 large egg yolk
-
2 teaspoons pure vanilla extract
For the Cinnamon-Sugar Coating
-
¼ cup granulated sugar
-
2 teaspoons ground cinnamon
For the Pumpkin Cream Filling
-
½ cup unsalted butter, softened
-
4 ounces cream cheese, softened
-
¼ cup pumpkin purée
-
½ teaspoon ground cinnamon
-
¼ teaspoon ground nutmeg
-
1 teaspoon pure vanilla extract
-
2–2 ½ cups powdered sugar (adjust for desired consistency)
Directions
1. Prepare the Cookie Dough
In a medium bowl, whisk together the flour, baking soda, cream of tartar, salt, cinnamon, nutmeg, and ginger. Set aside. In a large mixing bowl, beat the butter, granulated sugar, and brown sugar together until light and fluffy — about 2 minutes. Add the pumpkin purée, egg yolk, and vanilla extract. Mix until well combined.
Gradually add the dry ingredients into the wet mixture, stirring just until a dough forms. The dough should be soft but not sticky. Cover the bowl with plastic wrap and refrigerate for at least 30–45 minutes to make rolling easier.
2. Coat the Cookies in Cinnamon Sugar
In a small bowl, combine the granulated sugar and cinnamon for coating. Scoop out about 1 ½ tablespoons of dough and roll it into a ball. Gently roll each ball in the cinnamon-sugar mixture until fully coated. Place the coated dough balls on a parchment-lined baking sheet, spacing them about 2 inches apart.
3. Bake to Golden Perfection
Preheat the oven to 350°F (175°C). Bake the cookies for 10–12 minutes or until the edges are set and slightly golden but the centers still look soft. Allow them to cool on the baking sheet for 5 minutes before transferring them to a wire rack to cool completely.
4. Prepare the Pumpkin Cream Filling
In a large bowl, beat the butter and cream cheese together until creamy and smooth. Add the pumpkin purée, cinnamon, nutmeg, and vanilla extract. Beat again until well combined. Gradually add powdered sugar, ½ cup at a time, until the frosting is thick, smooth, and spreadable. If the mixture is too soft, refrigerate for 15 minutes to firm up slightly.
5. Assemble the Cookie Sandwiches
Pair cookies of similar size. Spread or pipe a generous layer of pumpkin cream filling onto the flat side of one cookie, then top it with another cookie to create a sandwich. Gently press together until the filling spreads to the edges.
For a bakery-style look, you can use a piping bag fitted with a round or star tip to add a decorative swirl of filling before placing the top cookie. Chill the assembled sandwiches for 15–20 minutes to help them set.
6. Serve and Enjoy
These Pumpkin Snickerdoodle Cookie Sandwiches are best enjoyed at room temperature, when the cookies are soft and the filling is creamy. Serve them with a warm mug of spiced tea, hot chocolate, or freshly brewed coffee for the perfect fall dessert moment.
Tips for Success
-
Chill the dough: This step prevents the cookies from spreading too much in the oven and ensures a soft, chewy texture.
-
Use pumpkin purée, not pie filling: Pumpkin pie filling contains added sugars and spices that will alter the flavor and consistency.
-
Don’t overbake: The cookies should look slightly underdone when you take them out. They’ll continue to bake on the sheet.
-
Pipe the filling: For a neater, more professional look, pipe the filling instead of spreading it with a spoon.
-
Add a pinch of extra spice: For more flavor depth, increase the cinnamon or nutmeg slightly.
Variations
-
Pumpkin Spice Latte Sandwiches: Add a teaspoon of instant espresso powder to the cookie dough for a subtle coffee twist.
-
Maple Pumpkin Filling: Replace half the powdered sugar with 2 tablespoons of pure maple syrup for a rich, autumnal sweetness.
-
Cream Cheese-Free Version: Skip the cream cheese and use all butter for a lighter, more buttercream-style filling.
-
Mini Sandwiches: Make smaller cookie rounds for bite-sized treats — perfect for parties or gifting.
-
Gluten-Free Option: Substitute with a gluten-free all-purpose flour blend (1:1 ratio) to make the recipe gluten-free without losing texture.
Make Ahead and Storage
-
Make ahead: You can prepare the cookie dough up to 2 days in advance. Keep it refrigerated until ready to bake.
-
Freezing the dough: Roll the dough into balls, coat with cinnamon sugar, and freeze on a baking sheet. Once solid, transfer them to a freezer bag for up to 2 months. Bake directly from frozen, adding an extra minute to the baking time.
-
Storing the sandwiches: Keep the assembled cookie sandwiches in an airtight container in the refrigerator for up to 4 days. Let them sit at room temperature for about 15 minutes before serving.
-
Freezing finished cookies: Freeze assembled cookie sandwiches for up to 1 month. Thaw in the refrigerator overnight before serving.
Serving Ideas
These cookies are versatile and festive enough for any occasion:
-
Thanksgiving Dessert Tray: Add them alongside pumpkin pie, pecan bars, and apple crisp for a stunning fall dessert spread.
-
Fall Bake Sale: Wrap each cookie sandwich in parchment paper or decorative cellophane for an irresistible, giftable treat.
-
Autumn Gatherings: Serve them at your next pumpkin-carving night or movie marathon for a cozy touch.
-
Holiday Gifts: Stack a few sandwiches in a decorative tin or jar tied with a rustic ribbon — a thoughtful, homemade holiday gift.
Healthier Ingredient Swaps
You can easily make this recipe a bit lighter without sacrificing flavor:
-
Use whole wheat pastry flour: Adds fiber and nutrients while maintaining a tender texture.
-
Reduce sugar: Cut the sugar in the dough slightly (to ½ cup each of granulated and brown sugar) for a less-sweet version.
-
Low-fat cream cheese: Substitute regular cream cheese with a lighter version to reduce calories.
-
Coconut sugar: Replace granulated sugar with coconut sugar for a more natural sweetness and caramel-like flavor.
Troubleshooting Guide
Cookies spread too much:
Make sure the dough was chilled long enough. If your kitchen is warm, chill the dough between batches.
Cookies came out dry:
You may have added too much flour or baked them too long. Spoon and level your flour properly to avoid over-measuring.
Filling too runny:
Add more powdered sugar or refrigerate the filling for 15–20 minutes before assembling.
Cookies sticking together in storage:
Layer them with parchment paper and store in a single layer to maintain their shape and texture.
The Perfect Fall Dessert
There’s no denying it — these Pumpkin Snickerdoodle Cookie Sandwiches are everything you want in a fall dessert. They bring together the cozy spices of autumn, the soft chew of a classic snickerdoodle, and the creamy richness of pumpkin filling. Each bite feels like a celebration of the season’s best flavors — familiar, comforting, and just the right amount of indulgent.
Whether you’re baking them for a Thanksgiving feast, a cozy weekend treat, or simply because you can’t get enough pumpkin spice, these cookie sandwiches are sure to become a seasonal favorite. They’re a wonderful way to share the joy of homemade baking with friends and family — one deliciously spiced bite at a time.
Frequently Asked Questions
1. Can I make these cookie sandwiches ahead of time?
Yes, these Pumpkin Snickerdoodle Cookie Sandwiches are perfect for making ahead, especially during busy holiday seasons. You can easily prepare the cookies one to two days in advance and store them in an airtight container at room temperature. When ready to serve, simply whip up the pumpkin cream filling and assemble the sandwiches. This method ensures the cookies remain soft and fresh, while the filling stays creamy and smooth. If you’d like to get a jump on your baking, you can even make both the cookies and the filling ahead of time — just store the cookies at room temperature and refrigerate the filling separately. Before assembling, allow the filling to sit at room temperature for 15–20 minutes so it’s soft enough to spread or pipe easily.
2. Can I freeze the cookie dough?
Absolutely! Freezing cookie dough is a great way to have fresh-baked Pumpkin Snickerdoodles ready anytime. After preparing the dough, scoop it into individual balls and roll them in the cinnamon-sugar coating. Place them on a baking sheet lined with parchment paper and freeze until firm. Once solid, transfer the dough balls to a freezer-safe bag or airtight container, labeling it with the date. The dough will keep for up to two months. When you’re ready to bake, there’s no need to thaw — just bake the frozen dough directly from the freezer, adding an extra minute or two to the baking time. You’ll still get the same soft, chewy texture and that irresistible cinnamon aroma.
3. What’s the best way to keep them soft?
The secret to keeping these cookie sandwiches soft and tender is proper storage. Once assembled, store them in an airtight container lined with parchment paper to prevent sticking. To maintain their moist texture, add a small piece of fresh bread or a slice of apple to the container — this trick helps retain just the right amount of humidity without making the cookies soggy. Keep the container at room temperature for up to two days, or refrigerate for up to four days if you need them to last longer. Before serving, allow refrigerated cookies to come to room temperature for the perfect texture.
4. Can I make them dairy-free?
Yes, this recipe can easily be made dairy-free without compromising flavor or texture. Simply replace the butter with a high-quality plant-based alternative and use a dairy-free cream cheese for the filling. Choose a vegan butter that’s formulated for baking — one that remains stable at room temperature and doesn’t melt too quickly. For the cream cheese, opt for a smooth, tangy dairy-free brand to keep the filling rich and flavorful. The result is a perfectly spiced, creamy, and indulgent cookie sandwich that everyone — dairy-free or not — will love.
Pumpkin Snickerdoodle Cookie Sandwiches Recipe
- Total Time: 1 hour 15 minutes
- Yield: 12–14 cookie sandwiches 1x
Description
These Pumpkin Snickerdoodle Cookie Sandwiches are the ultimate fall dessert — soft, spiced, and filled with creamy pumpkin goodness. Each bite delivers a perfect balance of cinnamon warmth and rich, velvety filling. They’re ideal for Thanksgiving gatherings, cozy weekends, or as a sweet homemade gift during the holiday season.
Ingredients
-
2 ¾ cups all-purpose flour
-
1 teaspoon baking soda
-
2 teaspoons cream of tartar
-
½ teaspoon salt
-
2 teaspoons ground cinnamon
-
½ teaspoon ground nutmeg
-
¼ teaspoon ground ginger
-
1 cup unsalted butter, softened
-
¾ cup granulated sugar
-
½ cup packed light brown sugar
-
⅓ cup pumpkin purée (not pumpkin pie filling)
-
1 large egg yolk
-
2 teaspoons pure vanilla extract
Cinnamon-Sugar Coating:
-
¼ cup granulated sugar
-
2 teaspoons ground cinnamon
Pumpkin Cream Filling:
-
½ cup unsalted butter, softened
-
4 ounces cream cheese, softened
-
¼ cup pumpkin purée
-
½ teaspoon ground cinnamon
-
¼ teaspoon ground nutmeg
-
1 teaspoon pure vanilla extract
-
2–2 ½ cups powdered sugar (adjust for consistency)
Instructions
-
In a medium bowl, whisk together the flour, baking soda, cream of tartar, salt, cinnamon, nutmeg, and ginger. Set aside.
-
In a large mixing bowl, beat butter, granulated sugar, and brown sugar together until light and fluffy, about 2 minutes. Add pumpkin purée, egg yolk, and vanilla extract, mixing until combined.
-
Gradually add the dry ingredients to the wet ingredients, stirring until a soft dough forms. Cover the bowl and refrigerate for 30–45 minutes to firm up.
-
Mix the cinnamon-sugar coating in a small bowl. Roll about 1 ½ tablespoons of dough into balls and coat each in the cinnamon-sugar mixture. Place on a parchment-lined baking sheet, spacing 2 inches apart.
-
Preheat oven to 350°F (175°C). Bake for 10–12 minutes, until the edges are set and the centers are soft. Let cool on the baking sheet for 5 minutes, then transfer to a wire rack to cool completely.
-
To make the filling, beat butter and cream cheese until smooth. Add pumpkin purée, cinnamon, nutmeg, and vanilla, and mix well. Gradually add powdered sugar until the filling is thick and spreadable.
-
Pair cookies of similar size. Spread or pipe a layer of filling on the flat side of one cookie, then top with another to create a sandwich.
-
Chill the sandwiches for 15–20 minutes before serving to help them set.
Notes
-
Chill the dough to prevent excessive spreading and to achieve a soft, chewy texture.
-
Use pumpkin purée, not pumpkin pie filling, to avoid extra sugars and spices.
-
Do not overbake; the cookies should look slightly underdone when removed from the oven.
-
For a neat look, pipe the filling with a round or star tip instead of spreading it with a spoon.
-
Store assembled cookies in an airtight container in the refrigerator for up to 4 days. Let sit at room temperature before serving.
- Prep Time: 25 minutes
- Cook Time: 12 minutes per batch