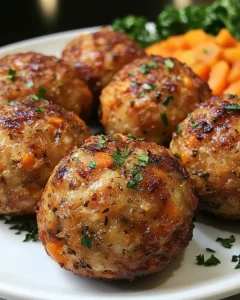
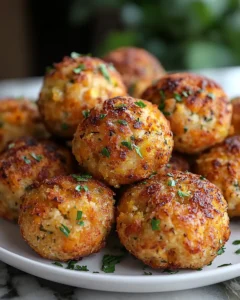
As the air turns crisp and the leaves blaze with hues of gold and crimson, nothing says comfort and celebration like the warm, inviting aroma of a holiday feast. Golden Butternut Squash Stuffing Balls are the perfect embodiment of autumn’s bounty—a harmonious blend of tender squash, savory herbs, and a hint of sweetness that melts in your mouth with every bite. Whether you’re preparing a Thanksgiving spread, a festive dinner, or simply craving a cozy weeknight treat, these golden delights bring a touch of elegance to your table.
This recipe was inspired by family gatherings where seasonal vegetables took center stage. Growing up, the tradition of roasting squash and combining it with fresh herbs became a symbol of togetherness and warmth. With each bite, the memories of laughter, storytelling, and the joy of sharing food come alive. Now, this recipe offers a modern twist: easy-to-make stuffing balls that are both visually stunning and irresistibly flavorful, perfect for any occasion when you want to impress guests or treat yourself.
Ingredients
-
2 cups cooked butternut squash, mashed
-
2 cups bread cubes, preferably day-old or slightly toasted
-
1 small onion, finely diced
-
2 cloves garlic, minced
-
1/2 cup grated Parmesan or vegetarian cheese alternative
-
1/4 cup chopped fresh parsley
-
1 teaspoon dried sage
-
1 teaspoon dried thyme
-
1/2 teaspoon ground black pepper
-
1/2 teaspoon salt, or to taste
-
1/4 teaspoon nutmeg (optional, for a warm autumn flavor)
-
1/2 cup vegetable broth
-
2 tablespoons olive oil, plus more for drizzling
-
1 egg, lightly beaten (optional, for binding)
Directions
-
Prepare the Squash: Peel and cube the butternut squash. Place the cubes in a pot of boiling water and cook for 15–20 minutes until tender. Drain and mash until smooth. Set aside to cool slightly.
-
Toast the Bread Cubes: Preheat the oven to 350°F (175°C). Spread bread cubes on a baking sheet and toast for 8–10 minutes until slightly golden and crisp. This ensures they absorb moisture from the squash without becoming soggy.
-
Sauté the Aromatics: In a skillet, heat 2 tablespoons of olive oil over medium heat. Add the diced onion and sauté for 3–4 minutes until translucent. Add minced garlic and cook for an additional minute until fragrant. Remove from heat and allow to cool slightly.
-
Mix the Stuffing: In a large mixing bowl, combine the mashed squash, toasted bread cubes, sautéed onion and garlic, grated cheese, chopped parsley, sage, thyme, black pepper, salt, and nutmeg. Gradually add vegetable broth to reach a moist, but not overly wet, consistency. If the mixture feels too loose, incorporate a lightly beaten egg to help bind the ingredients.
-
Shape the Balls: Using your hands, scoop small portions of the mixture and roll them into balls about 1.5 inches in diameter. Arrange them on a lightly greased baking sheet.
-
Bake to Golden Perfection: Drizzle the balls with a little olive oil to enhance browning. Bake in the preheated oven for 20–25 minutes, turning halfway through, until the balls are golden brown and slightly crisp on the outside.
-
Serve and Enjoy: Remove from the oven and allow the stuffing balls to cool for a few minutes. Serve warm as a side dish, appetizer, or even a standalone snack. They pair beautifully with roasted vegetables, cranberry sauce, or a fresh green salad.
Prep Time, Cook Time, Total Time, Yield
-
Prep Time: 15 minutes
-
Cook Time: 45 minutes
-
Total Time: 1 hour
-
Yield: 18–20 stuffing balls
Notes
-
Make Ahead Tip: You can prepare the squash and bread cubes in advance. Store them separately in airtight containers until ready to assemble the balls.
-
Freezing: These stuffing balls freeze beautifully. Arrange them on a baking sheet in a single layer, freeze until solid, then transfer to a freezer-safe bag. Bake directly from frozen, adding 5–10 extra minutes to cooking time.
-
Cheese Options: Parmesan adds a nutty flavor, but you can experiment with other hard cheeses or plant-based alternatives for a vegetarian-friendly option.
-
Herb Variations: Swap sage or thyme with rosemary or tarragon for a different flavor profile. Fresh herbs give the best aroma, but dried herbs work well too.
-
Crispier Exterior: For extra crispiness, lightly brush the balls with melted butter or oil before baking.
Why You’ll Love These Stuffing Balls
Golden Butternut Squash Stuffing Balls are more than just a side dish—they are a celebration of seasonal produce and comforting flavors. Unlike traditional stuffing, which can sometimes be dense or soggy, these bite-sized balls have the perfect balance of crispy exterior and tender, flavorful interior. Each mouthful is rich with autumnal warmth, blending savory herbs and the natural sweetness of roasted squash.
These stuffing balls are versatile. They can be served at holiday feasts, casual family dinners, or even as elegant hors d’oeuvres at a dinner party. Their golden color brightens up any plate, making them as visually appealing as they are delicious.
Tips for Perfect Stuffing Balls
-
Avoid Overmixing: When combining the ingredients, mix just until combined to keep the texture light. Overmixing can make the balls dense.
-
Use Day-Old Bread: Slightly stale bread absorbs moisture without turning mushy, creating the ideal texture.
-
Season in Layers: Season the squash, onion, and final mixture separately to ensure balanced flavor in every bite.
-
Even Sizing: Roll the balls to uniform size to ensure consistent cooking. Use a cookie scoop for ease.
-
Enhance Flavor: Roast the squash instead of boiling for a deeper, caramelized flavor.
Pairing Ideas
Golden Butternut Squash Stuffing Balls are incredibly versatile. Here are some pairing suggestions to elevate your meal:
-
Vegetable Medley: Serve alongside roasted Brussels sprouts, carrots, or green beans for a hearty vegetarian plate.
-
Salads: A crisp autumn salad with arugula, pomegranate seeds, and a light vinaigrette complements the richness of the stuffing balls.
-
Sauces: Cranberry sauce, apple chutney, or a simple herbed yogurt dip adds a burst of flavor.
-
Main Courses: Pair with roasted chicken, turkey, or a plant-based roast to create a festive, crowd-pleasing meal.
Health Benefits
Butternut squash is not only delicious but also packed with nutrients. It is rich in vitamin A, vitamin C, and fiber, supporting eye health, immunity, and digestion. By using olive oil and plant-based cheese alternatives, these stuffing balls are heart-friendly and suitable for a variety of dietary preferences. Using fresh herbs not only enhances flavor but also contributes antioxidants and phytonutrients.
Making It Your Own
The beauty of this recipe is its flexibility. You can adapt it to suit your tastes or the season:
-
Add Nuts or Seeds: Toasted pecans, walnuts, or pumpkin seeds add crunch and richness.
-
Incorporate Other Vegetables: Sweet potato, carrot, or zucchini can be added to the mash for variety.
-
Spice it Up: Add a pinch of cayenne, smoked paprika, or cinnamon for a different flavor dimension.
-
Mini Appetizer Version: Roll the mixture smaller to create bite-sized appetizers perfect for parties or holiday gatherings.
Frequently Asked Questions (FAQs)
1. Can I make these ahead of time?
Absolutely! These stuffing balls are perfect for busy holiday schedules or meal prep. You can prepare the mixture up to a day in advance and store it in an airtight container in the refrigerator. This allows the flavors to meld together even more, making the final baked balls even more delicious. When you’re ready to bake, simply roll the chilled mixture into balls and follow the baking instructions. Preparing ahead not only saves time but also reduces stress on the day of your celebration, letting you focus on other dishes or spending quality time with family and friends. For longer storage, you can even freeze the mixture itself before shaping it into balls. When you’re ready to bake, thaw overnight in the refrigerator and then roll and bake as usual.
2. Can I bake them from frozen?
Yes, these stuffing balls freeze beautifully and can be baked directly from the freezer. To do this, arrange the rolled balls in a single layer on a baking sheet and freeze until solid. Once frozen, transfer them to a freezer-safe bag or container for longer storage. When it’s time to enjoy them, place the frozen balls on a baking sheet and bake as instructed, adding 5–10 extra minutes to the cooking time. Baking from frozen is convenient for holiday meal planning, last-minute parties, or whenever you crave a warm, comforting side dish without the extra prep. The balls will still turn out golden, crispy on the outside, and tender on the inside, with all the rich flavors intact.
3. Can I make them vegan?
Yes! Making vegan stuffing balls is easy and just as delicious. Replace the egg used for binding with a flax egg, which is made by combining 1 tablespoon of ground flaxseed with 3 tablespoons of water and letting it sit for a few minutes until it thickens. For the cheese, opt for a plant-based cheese alternative or nutritional yeast for a cheesy flavor without dairy. This adaptation makes the recipe suitable for a vegan diet while keeping the same comforting, flavorful texture. You can also use vegan butter or olive oil in place of any other dairy-based ingredients to keep the recipe fully plant-based.
4. How do I make them extra crispy?
For a golden, crisp exterior, lightly brush the balls with olive oil or melted vegan butter before baking. This helps develop a beautiful color and adds extra flavor. For an even crunchier finish, you can broil them for 1–2 minutes at the end of baking, but be sure to watch carefully to prevent burning. Using day-old or slightly toasted bread also contributes to a firmer texture that holds up well during baking.
5. Can I customize the flavors?
Absolutely! These stuffing balls are highly versatile. Add nuts, seeds, or other vegetables to suit your taste. You can adjust the herbs or spices, such as rosemary, paprika, or cinnamon, to create a unique flavor profile. This flexibility makes them perfect for both traditional holiday meals and creative everyday dinners.
Golden Butternut Squash Stuffing Balls Recipe
- Total Time: 1 hour
- Yield: 18–20 stuffing balls 1x
Description
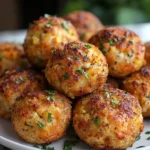
Golden Butternut Squash Stuffing Balls are a perfect autumn or holiday treat, combining tender roasted squash, savory herbs, and a lightly crisped exterior. These bite-sized delights are ideal for Thanksgiving, festive dinners, or cozy family meals. Inspired by seasonal flavors and comforting traditions, they bring warmth and flavor to your table in every bite.
Ingredients
-
2 cups cooked butternut squash, mashed
-
2 cups bread cubes, preferably day-old or slightly toasted
-
1 small onion, finely diced
-
2 cloves garlic, minced
-
1/2 cup grated Parmesan or vegetarian cheese alternative
-
1/4 cup chopped fresh parsley
-
1 teaspoon dried sage
-
1 teaspoon dried thyme
-
1/2 teaspoon ground black pepper
-
1/2 teaspoon salt, or to taste
-
1/4 teaspoon nutmeg (optional)
-
1/2 cup vegetable broth
-
2 tablespoons olive oil, plus more for drizzling
-
1 egg, lightly beaten (optional, for binding)
Instructions
-
Peel and cube the butternut squash, then boil for 15–20 minutes until tender. Drain and mash, then set aside.
-
Preheat the oven to 350°F (175°C) and toast bread cubes on a baking sheet for 8–10 minutes until lightly golden.
-
In a skillet, heat 2 tablespoons olive oil over medium heat. Sauté diced onion for 3–4 minutes until translucent, then add garlic and cook 1 more minute. Remove from heat.
-
In a large bowl, combine mashed squash, toasted bread, sautéed onion and garlic, grated cheese, parsley, sage, thyme, pepper, salt, and nutmeg. Add vegetable broth gradually. Optionally, mix in a lightly beaten egg if needed for binding.
-
Shape the mixture into 1.5-inch balls and arrange them on a greased baking sheet.
-
Drizzle with olive oil and bake for 20–25 minutes, turning halfway through, until golden and slightly crisp.
-
Let cool for a few minutes and serve warm as a side dish, appetizer, or snack.
Notes
- Prep Time: 15 minutes
- Cook Time: 45 minutes