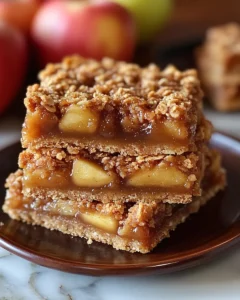
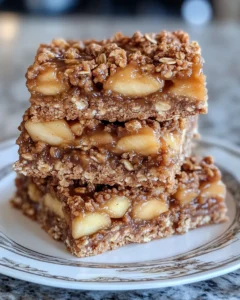
There’s something truly magical about the cozy, golden days of fall when the scent of warm apples, cinnamon, and caramel fills the air. It’s the season of comfort, where every bite feels like a nostalgic hug. These Caramel Apple Harvest Bars are the perfect dessert to capture that feeling—soft, buttery layers packed with tender apples, sweet caramel, and a hint of spice. Whether you’re gathering with family after a weekend apple-picking trip, baking for a fall bake sale, or simply craving something sweet and seasonal, these bars promise to bring warmth and joy to your table. Inspired by the classic caramel apple, this recipe turns the fairground favorite into a soft, bakery-style dessert bar that’s easy to make and impossible to resist.
Ingredients
For the Apple Filling:
-
3 medium apples (Granny Smith or Honeycrisp), peeled, cored, and diced
-
2 tablespoons unsalted butter
-
2 tablespoons brown sugar
-
1 teaspoon ground cinnamon
-
½ teaspoon ground nutmeg
-
1 tablespoon all-purpose flour
-
1 teaspoon lemon juice
For the Caramel Sauce:
-
1 cup light brown sugar
-
½ cup unsalted butter
-
¼ cup heavy cream
-
1 teaspoon pure vanilla extract
-
Pinch of salt
For the Crust and Topping:
-
2 cups all-purpose flour
-
1 ½ cups old-fashioned oats
-
1 cup light brown sugar, packed
-
1 teaspoon baking powder
-
½ teaspoon baking soda
-
½ teaspoon salt
-
1 teaspoon ground cinnamon
-
1 cup unsalted butter, melted
Directions
1. Prepare the Apple Filling
In a medium skillet over medium heat, melt the butter and add the diced apples. Stir in brown sugar, cinnamon, nutmeg, and flour. Cook for about 5–7 minutes until the apples begin to soften and the mixture thickens slightly. Add lemon juice and stir to combine. Remove from heat and set aside to cool. This step helps develop that deep, caramelized apple flavor that gives the bars their signature autumn taste.
2. Make the Caramel Sauce
In a small saucepan, combine brown sugar, butter, and heavy cream. Bring to a gentle simmer over medium heat, stirring constantly until the sugar dissolves and the mixture thickens—about 4–5 minutes. Remove from heat, then add vanilla extract and a pinch of salt. Stir until smooth and glossy. Let the sauce cool slightly as you prepare the crust mixture.
3. Prepare the Crust and Topping
In a large mixing bowl, whisk together flour, oats, brown sugar, baking powder, baking soda, salt, and cinnamon. Pour in the melted butter and stir until the mixture is evenly moistened and crumbly. This will act as both the crust and the topping of your bars.
4. Assemble the Bars
Preheat your oven to 350°F (175°C). Line a 9×13-inch baking pan with parchment paper, leaving some overhang for easy removal. Press about two-thirds of the oat mixture into the bottom of the prepared pan to form the crust. Spread the cooked apple filling evenly over the crust. Drizzle half of the caramel sauce over the apples, then sprinkle the remaining oat mixture on top.
5. Bake the Bars
Bake for 30–35 minutes or until the top is golden brown and slightly crisp. The filling should be bubbling around the edges. Remove from the oven and allow to cool completely in the pan. Once cooled, drizzle the remaining caramel sauce over the top for that irresistible, glossy finish.
6. Slice and Serve
Use the parchment overhang to lift the bars from the pan. Place them on a cutting board and slice into squares or rectangles. These bars are delicious served at room temperature, slightly chilled, or even warmed with a scoop of vanilla ice cream for an extra indulgent treat.
Prep Time
20 minutes
Cook Time
35 minutes
Total Time
55 minutes
Yield
12–16 bars
Notes
-
For best results, use firm apples like Granny Smith, Honeycrisp, or Fuji. Their texture holds up well during baking.
-
If you prefer a thicker caramel layer, double the caramel sauce recipe and reserve half for drizzling after baking.
-
Store leftovers in an airtight container at room temperature for up to 2 days or refrigerate for up to 5 days.
-
For a nutty twist, sprinkle chopped pecans or walnuts on top before baking.
-
These bars also freeze beautifully—simply wrap each piece individually and thaw before serving.
The Magic of Caramel Apple Flavor
The combination of buttery crust, tender apples, and rich caramel is pure fall comfort. What makes these Caramel Apple Harvest Bars so special is how they balance sweetness and warmth without being heavy. The soft apples melt into the crumbly oat base, creating layers of texture in every bite. The hint of cinnamon and nutmeg adds that nostalgic autumn spice that pairs perfectly with coffee, cider, or even a mug of hot chocolate.
There’s a reason caramel apples have stood the test of time. They represent everything we love about the harvest season—sweetness, comfort, and tradition. This recipe takes that same classic pairing and transforms it into a more shareable, mess-free dessert that everyone will love.
How to Customize Your Caramel Apple Harvest Bars
Make Them Extra Crunchy
If you like a little crunch in your dessert, add chopped toasted pecans, walnuts, or almonds to the topping before baking. They’ll roast beautifully in the oven and add a nutty contrast to the sweet caramel.
Add a Touch of Salt
For those who adore sweet and salty desserts, sprinkle a bit of flaky sea salt on top after drizzling the caramel. This simple addition enhances the caramel’s depth and balances the sweetness.
Go for a Rustic Look
Don’t worry about making them look perfect—these bars are meant to be a little messy and rustic. The oozing caramel, tender apples, and golden oat topping are what make them look (and taste) homemade.
Make It Gluten-Free
To make gluten-free Caramel Apple Harvest Bars, substitute the all-purpose flour with a 1:1 gluten-free baking blend and use certified gluten-free oats. The texture and flavor remain just as comforting and delicious.
Add a Drizzle of White Chocolate
For an elegant finish, melt some white chocolate and drizzle it over the cooled bars along with the caramel. The creamy sweetness complements the tart apples beautifully.
Storing and Serving Tips
These bars taste incredible fresh from the oven but are just as satisfying the next day. In fact, the flavors deepen as the caramel settles into the layers. Here’s how to make the most of your batch:
-
Room Temperature: Store in an airtight container for up to 2 days.
-
Refrigerator: Store in the fridge for up to 5 days for a chewier texture.
-
Freezer: Wrap each bar individually in parchment paper, then store in a freezer-safe bag for up to 3 months. Thaw at room temperature before serving.
-
Serving Tip: Warm a bar for 10 seconds in the microwave and top with vanilla ice cream or whipped cream for an instant dessert upgrade.
Why You’ll Love This Recipe
-
Simple ingredients, big flavor: You likely already have everything you need in your pantry.
-
Perfect for any occasion: Great for potlucks, bake sales, Thanksgiving, or a weekend treat.
-
Easy to transport: No need for forks or plates—these bars are ideal for sharing.
-
Versatile: You can adjust the spices, apples, or topping to suit your taste.
-
Comfort in every bite: It’s the taste of caramel apples and apple crisp combined into one easy dessert.
Pairing Ideas
To create the ultimate fall dessert experience, pair these bars with a few simple additions:
-
Warm beverages: Serve with spiced apple cider, cinnamon tea, or hot chocolate.
-
Savory balance: Enjoy after a hearty fall dinner like roasted chicken, butternut squash soup, or a creamy pasta dish.
-
Sweet accompaniments: Drizzle with additional caramel or top with whipped cream for extra indulgence.
Frequently Asked Questions
Can I use store-bought caramel sauce instead of homemade?
Yes! If you’re short on time or prefer a shortcut, high-quality store-bought caramel sauce works beautifully for these bars. The key is to choose a thick and rich caramel rather than a thin, runny variety, which could make the bars soggy. A good store-bought sauce should hold its shape when drizzled and provide that creamy, buttery flavor reminiscent of homemade caramel. To make it easier to work with, gently warm the sauce in a small saucepan or microwave for a few seconds before pouring it over the apple filling. This ensures it spreads evenly without hardening immediately and blends seamlessly with the other layers. Even with a store-bought version, the bars still achieve that indulgent, bakery-style appeal that makes them irresistible.
What kind of apples should I use?
Choosing the right apples is crucial for texture and flavor. Firm, tart varieties like Granny Smith work best because they hold their shape during baking and provide a pleasant balance to the sweetness of the caramel. If you prefer a slightly sweeter bite, you can mix varieties—Honeycrisp or Fuji apples add natural sweetness and a crisp texture, creating a more complex flavor profile. Avoid soft or very juicy apples like McIntosh, as they can turn mushy and release too much liquid, making the bars overly soft. Peeling, coring, and dicing the apples uniformly helps them cook evenly, ensuring every bite has that perfect balance of tender apple and rich caramel flavor.
How do I keep the crust from getting soggy?
A common concern with layered desserts is a soggy bottom crust. To prevent this, ensure your apple filling is slightly thickened before layering it on the crust. Cooking the apples with sugar, butter, and a bit of flour or cornstarch allows the juices to bind, preventing them from seeping into the crust. Pressing the crust firmly into the pan before adding the filling also creates a solid base. After baking, allow the bars to cool completely in the pan before slicing; this step is critical as it lets the caramel and apple juices set properly. Cutting too soon can cause the layers to collapse or ooze, reducing the clean, neat presentation of the bars.
Can I make these bars ahead of time?
Absolutely. These bars are ideal for preparing in advance, whether for a holiday gathering, weekend treat, or special occasion. You can bake them a day or two ahead, store them in an airtight container at room temperature, and drizzle any extra caramel just before serving. This keeps the top layer glossy and fresh-looking, while the bars themselves remain soft and flavorful. They also freeze exceptionally well—wrap individual bars in parchment or plastic wrap, place them in a freezer-safe bag, and thaw at room temperature when ready to enjoy. Making them ahead not only saves time but also allows the flavors to meld beautifully, enhancing the sweet, spiced apple and caramel combination.
Print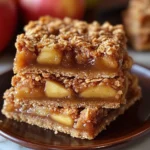
Caramel Apple Harvest Bars Recipe
- Total Time: 55 minutes
- Yield: 12–16 bars 1x
Description
These Caramel Apple Harvest Bars are a cozy, autumn-inspired dessert that combines tender apples, rich caramel, and a buttery oat crust. Perfect for family gatherings, fall bake sales, or a simple weekend treat, these bars capture the nostalgic flavors of caramel apples in a soft, shareable form. With a hint of cinnamon and nutmeg, they bring warmth and comfort to every bite, making them a seasonal favorite that’s both easy to make and irresistible.
Ingredients
For the Apple Filling:
-
3 medium apples (Granny Smith or Honeycrisp), peeled, cored, and diced
-
2 tablespoons unsalted butter
-
2 tablespoons brown sugar
-
1 teaspoon ground cinnamon
-
½ teaspoon ground nutmeg
-
1 tablespoon all-purpose flour
-
1 teaspoon lemon juice
For the Caramel Sauce:
-
1 cup light brown sugar
-
½ cup unsalted butter
-
¼ cup heavy cream
-
1 teaspoon pure vanilla extract
-
Pinch of salt
For the Crust and Topping:
-
2 cups all-purpose flour
-
1 ½ cups old-fashioned oats
-
1 cup light brown sugar, packed
-
1 teaspoon baking powder
-
½ teaspoon baking soda
-
½ teaspoon salt
-
1 teaspoon ground cinnamon
-
1 cup unsalted butter, melted
Instructions
-
In a medium skillet over medium heat, melt the butter and add the diced apples. Stir in brown sugar, cinnamon, nutmeg, and flour. Cook for 5–7 minutes until apples soften and mixture thickens. Add lemon juice, stir, and set aside to cool.
-
In a small saucepan, combine brown sugar, butter, and heavy cream. Simmer over medium heat, stirring constantly for 4–5 minutes until thickened. Remove from heat, add vanilla extract and salt, stir until smooth, and let cool slightly.
-
In a large bowl, whisk together flour, oats, brown sugar, baking powder, baking soda, salt, and cinnamon. Pour in melted butter and stir until crumbly and evenly moistened.
-
Preheat oven to 350°F (175°C). Line a 9×13-inch pan with parchment paper. Press two-thirds of the oat mixture into the bottom for the crust. Spread apple filling evenly over the crust. Drizzle half the caramel sauce over apples, then sprinkle remaining oat mixture on top.
-
Bake for 30–35 minutes until top is golden and slightly crisp. Remove and allow to cool completely. Drizzle remaining caramel sauce over cooled bars.
-
Lift bars from pan using parchment overhang, slice into squares or rectangles, and serve at room temperature, slightly chilled, or warmed with ice cream.
Notes
-
Use firm apples like Granny Smith, Honeycrisp, or Fuji for best texture.
-
For a thicker caramel layer, double the caramel recipe and reserve half for drizzling after baking.
-
Store leftovers in an airtight container at room temperature for up to 2 days or refrigerate for up to 5 days.
-
Optional: add chopped pecans or walnuts to the topping for a nutty twist.
-
Bars freeze well; wrap individually and thaw before serving.
- Prep Time: 20 minutes
- Cook Time: 35 minutes