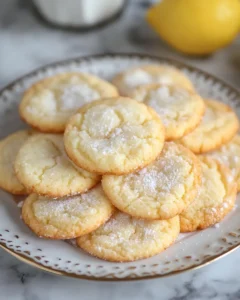
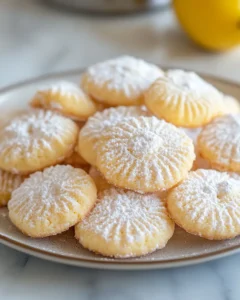
There’s something timeless about the aroma of freshly baked cookies filling your kitchen, and Homemade Anginetti Cookies are a perfect example of that comforting magic. These soft, chewy, and lightly citrus-flavored Italian cookies bring warmth to any occasion, whether you’re hosting a festive holiday gathering, enjoying a cozy evening at home with a cup of tea, or sharing treats with friends and neighbors.
The inspiration for this recipe comes from traditional Italian baking, where simple ingredients and family techniques transform everyday dough into something extraordinary. Passed down through generations, Anginetti cookies are a beloved treat in Italian-American households, often baked in large batches for celebrations or quiet afternoons alike. Making these cookies at home allows you to recreate a cherished tradition while adding your personal touch to each bite.
Ingredients
-
1 cup unsalted butter, softened
-
1 ½ cups granulated sugar
-
2 large eggs
-
1 teaspoon vanilla extract
-
1 teaspoon almond extract
-
Zest of 1 lemon
-
3 ½ cups all-purpose flour
-
2 teaspoons baking powder
-
½ teaspoon salt
-
¼ cup milk
-
½ cup granulated sugar (for rolling)
Directions
-
Preheat the oven to 350°F (175°C) and line two baking sheets with parchment paper.
-
Cream the butter and sugar in a large bowl using an electric mixer until light and fluffy, about 3–4 minutes.
-
Add the eggs one at a time, mixing well after each addition. Stir in the vanilla extract, almond extract, and lemon zest until combined.
-
Whisk together the dry ingredients – flour, baking powder, and salt – in a separate bowl. Gradually add the dry ingredients to the wet mixture, alternating with milk, and mix until a soft dough forms.
-
Shape the dough into small 1-inch balls. Roll each ball in the remaining granulated sugar, ensuring they are fully coated.
-
Place the cookies on the prepared baking sheets about 2 inches apart to allow for spreading.
-
Bake for 12–15 minutes, or until the cookies are lightly golden on the edges but still soft in the center.
-
Cool on the baking sheets for 5 minutes before transferring to a wire rack to cool completely.
-
Serve and enjoy the cookies with a hot beverage or as part of a festive cookie platter.
Tips for the Perfect Anginetti Cookies
-
Room Temperature Ingredients: Ensure your butter and eggs are at room temperature for smoother dough and better mixing.
-
Flavor Variations: Experiment by adding orange zest or a touch of cinnamon for a subtle twist on the classic flavor.
-
Cookie Size: For larger cookies, increase baking time slightly and adjust spacing on the baking sheet.
-
Storage: Store in an airtight container at room temperature for up to one week. They can also be frozen for up to three months.
-
Rolling Sugar: Use coarse sugar for a sparkling exterior or fine sugar for a smoother finish.
Why You’ll Love This Recipe
Homemade Anginetti Cookies are more than just a sweet treat—they’re an experience. Each cookie offers a delicate balance of buttery richness and soft chewiness, with a hint of citrus that brightens every bite. They’re versatile, easy to make, and perfect for a variety of occasions:
-
Family Gatherings: Bake a batch to share with relatives during holidays or Sunday dinners.
-
Gift Giving: Package them in festive tins or clear bags for a thoughtful homemade gift.
-
Everyday Treats: Keep a jar on your counter for those moments when a sweet bite is needed to brighten your day.
Frequently Asked Questions
1. Can I make these cookies gluten-free?
Yes! Making Anginetti cookies gluten-free is simple with the right substitutions. Replace the all-purpose flour with a gluten-free flour blend specifically formulated for baking. These blends often contain a combination of rice flour, potato starch, and tapioca flour, and sometimes xanthan gum, which is essential for mimicking the elasticity and texture of traditional wheat flour. Without xanthan gum or another binder, gluten-free cookies can turn out crumbly or dry. Using a high-quality blend will help ensure your cookies maintain their signature soft and chewy texture. The flavor will remain delightfully similar to the classic version, with the same buttery richness and subtle citrus notes. For best results, gently fold the gluten-free flour into the wet ingredients rather than overmixing, which can create a dense texture.
2. How do I prevent the cookies from spreading too much?
Cookie spreading can be frustrating, but it’s easy to control with a few key steps. First, make sure your butter is softened but not melted. Butter that is too soft can cause the dough to flatten excessively in the oven. After mixing the dough, chill it in the refrigerator for 20–30 minutes before shaping it into balls. This step firms up the dough and slows spreading during baking. Additionally, spacing your cookie dough balls at least 2 inches apart on the baking sheet allows them room to expand without merging into each other. Using parchment paper or a silicone baking mat also helps cookies bake evenly and prevents sticking, ensuring each one retains a beautiful round shape.
3. Can I add toppings to the cookies?
Absolutely! One of the joys of Anginetti cookies is their versatility. You can lightly sprinkle coarse sugar, colored sugar, or finely chopped nuts over the dough balls before baking. These toppings add texture and a touch of visual flair, making your cookies look more festive. If you want a subtle flavor boost, you can also add a light dusting of cinnamon or a pinch of lemon zest on top. However, avoid heavy or overly wet toppings that could weigh down the cookies or affect their delicate texture. The key is to enhance the cookies’ flavor and appearance without overpowering their soft, buttery, citrus-infused profile.
4. Are Anginetti cookies suitable for freezing?
Yes, both the dough and baked cookies freeze well. To freeze unbaked dough, place the shaped balls in a single layer on a baking sheet and freeze until solid. Then transfer them to a freezer-safe bag or container. When ready to bake, you can place the frozen dough balls directly on a baking sheet and add 2–3 extra minutes to the baking time. For baked cookies, store them in an airtight container and freeze for up to three months. To enjoy, simply thaw at room temperature for 30–60 minutes. This makes it easy to enjoy fresh-tasting cookies anytime, perfect for last-minute gatherings or holiday gifting.
Baking Anginetti Cookies for Special Occasions
Anginetti cookies shine when included in holiday spreads or cookie exchanges. Their soft texture and subtle citrus flavor pair wonderfully with coffee, tea, or hot chocolate. To elevate the presentation, try stacking them on a decorative platter or arranging them in a tiered cookie tower.
These cookies are also a perfect activity for families or friends. Rolling dough, coating it in sugar, and arranging the cookies on baking sheets can become a shared ritual, creating memories alongside the sweet aroma that fills your home.
Healthier Modifications
While traditionally rich and buttery, Anginetti cookies can be modified for lighter versions without sacrificing flavor:
-
Butter Alternatives: Substitute half the butter with unsweetened applesauce for a softer, lower-fat cookie.
-
Sugar Adjustments: Reduce granulated sugar by 2–3 tablespoons for a slightly less sweet cookie.
-
Milk Options: Use plant-based milk such as almond or oat milk for a dairy-free variation.
Perfect Pairings
These cookies are best enjoyed with complementary flavors and beverages:
-
Hot Beverages: Coffee, tea, or hot chocolate enhances the cozy, comforting nature of Anginetti cookies.
-
Cheese Boards: Pair with mild cheeses for a sophisticated dessert board.
-
Fruit: Serve alongside fresh berries or citrus slices to highlight the lemon zest in the cookies.
Common Mistakes to Avoid
-
Overmixing the Dough: This can make cookies dense rather than soft and tender. Mix until ingredients are just combined.
-
Skipping the Sugar Coating: Rolling the cookies in sugar is key for that signature light crunch and sparkling appearance.
-
Baking Too Long: Anginetti cookies should remain soft in the center. Remove them from the oven when edges are lightly golden.
Why Anginetti Cookies Remain Popular
Anginetti cookies have a long-standing history in Italian-American households. Their popularity endures because they are simple to make, visually appealing, and universally loved. They bring a sense of nostalgia while allowing bakers to customize flavors and sizes according to preference.
Unlike heavier cookies or pastries, Anginetti cookies are light enough for multiple servings without feeling overly indulgent. Their unique texture—a delicate balance of soft chewiness and slightly crisp edges—makes them ideal for layering in cookie tins or presenting on dessert trays.
Serving Ideas
-
Classic Display: Stack in a pyramid on a decorative plate for a traditional look.
-
Gift Boxes: Line small boxes with parchment paper and place cookies in neat layers for gifting.
-
Cookie Sandwiches: Spread a thin layer of lemon or vanilla buttercream between two cookies for an elevated treat.
-
Dessert Buffet: Include alongside biscotti, shortbread, or almond cookies for variety in flavor and texture.
Final Thoughts
Baking Homemade Anginetti Cookies is more than just a culinary task—it’s a way to celebrate tradition, share warmth, and create lasting memories. These cookies are perfect for any occasion, from casual family tea times to festive celebrations. Their simplicity makes them accessible for bakers of all levels, while the result is sophisticated enough to impress guests.
Take the time to bake a batch, enjoy the aromatic sweetness filling your kitchen, and share the joy with friends and family. Once you try this recipe, Anginetti cookies may quickly become a staple in your home, offering comfort, nostalgia, and delightful flavor in every bite.
Print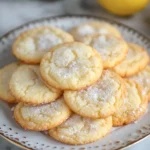
Homemade Anginetti Cookies
- Total Time: 35 minutes
- Yield: 3 dozen cookies 1x
Description
There’s nothing quite like the comforting aroma of freshly baked cookies filling your kitchen, and Homemade Anginetti Cookies are the perfect treat for any occasion. These soft, chewy Italian cookies, lightly flavored with lemon zest and almond extract, are ideal for cozy evenings, festive gatherings, or sharing with friends and family. Inspired by traditional Italian baking passed down through generations, this recipe brings the warmth of homemade cookies to your table while keeping the process simple and enjoyable. Whether you’re creating memories with loved ones or enjoying a quiet moment with a cup of tea, these cookies are a delightful choice.
Ingredients
-
1 cup unsalted butter, softened
-
1 ½ cups granulated sugar
-
2 large eggs
-
1 teaspoon vanilla extract
-
1 teaspoon almond extract
-
Zest of 1 lemon
-
3 ½ cups all-purpose flour
-
2 teaspoons baking powder
-
½ teaspoon salt
-
¼ cup milk
-
½ cup granulated sugar (for rolling)
Instructions
-
Preheat the oven to 350°F (175°C) and line two baking sheets with parchment paper.
-
Cream the butter and sugar in a large bowl using an electric mixer until light and fluffy, about 3–4 minutes.
-
Add the eggs one at a time, mixing well after each addition. Stir in the vanilla extract, almond extract, and lemon zest until combined.
-
Whisk together the dry ingredients – flour, baking powder, and salt – in a separate bowl. Gradually add the dry ingredients to the wet mixture, alternating with milk, and mix until a soft dough forms.
-
Shape the dough into small 1-inch balls. Roll each ball in the remaining granulated sugar, ensuring they are fully coated.
-
Place the cookies on the prepared baking sheets about 2 inches apart to allow for spreading.
-
Bake for 12–15 minutes, or until the cookies are lightly golden on the edges but still soft in the center.
-
Cool on the baking sheets for 5 minutes before transferring to a wire rack to cool completely.
-
Serve and enjoy the cookies with a hot beverage or as part of a festive cookie platter.
Notes
-
For best results, use fresh lemon zest to maximize flavor.
-
Dough can be refrigerated for up to 24 hours before baking, which can enhance flavor and texture.
-
Store cookies in an airtight container at room temperature for up to one week.
-
Freezing unbaked dough or baked cookies is also an option for long-term storage.
- Prep Time: 20 minutes
- Cook Time: 12–15 minutes