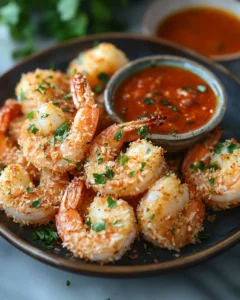
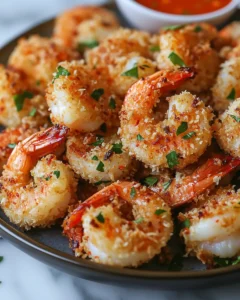
There are certain dishes that instantly transport you to a relaxed, sun-kissed moment, even if you’re standing in your kitchen on a busy weekday evening. Baked Coconut Shrimp is one of those recipes. It feels celebratory yet comforting, special enough for guests but simple enough for a family dinner. I first fell in love with coconut shrimp during a seaside vacation where the air smelled faintly of salt and toasted coconut. That memory inspired this oven-baked version, designed to deliver all the crunch and tropical flavor without deep frying. Paired with a creamy, sweet chili mayo, this dish turns an ordinary night into something memorable, whether you’re hosting friends, planning a cozy weekend meal, or just craving something crispy and satisfying.
Why You’ll Love This Oven-Baked Coconut Shrimp
This recipe proves that baking can be just as indulgent as frying when done right. The shrimp emerge golden, crunchy, and packed with flavor, thanks to a carefully balanced coating of coconut and panko breadcrumbs. Baking keeps the process cleaner and lighter while still giving you that irresistible crunch.
Another reason this dish stands out is versatility. Serve it as an appetizer for gatherings, a main dish with a fresh salad, or even as a filling for wraps and bowls. The sweet chili mayo adds a creamy contrast with a gentle heat that complements the coconut beautifully. Best of all, the recipe uses simple, accessible ingredients and straightforward steps, making it approachable even for beginner cooks.
Ingredients Breakdown and Flavor Notes
Understanding each ingredient helps you appreciate how this dish comes together and ensures the best possible results.
-
Large shrimp (450 g / 1 lb, peeled and deveined, tails on or off): Shrimp are the star of the recipe. Leaving the tails on makes them perfect for dipping, while removing them makes serving easier for main dishes.
-
All-purpose flour (60 g / ½ cup): The first coating layer helps the egg adhere to the shrimp.
-
Large eggs (2): Beaten eggs act as the glue that holds the coconut crust in place.
-
Unsweetened shredded coconut (80 g / 1 cup): Provides texture and a subtle, nutty sweetness without being overpowering.
-
Panko breadcrumbs (60 g / 1 cup): These Japanese-style breadcrumbs are lighter and crispier than regular breadcrumbs.
-
Salt (¾ teaspoon): Enhances all the flavors.
-
Black pepper (½ teaspoon): Adds gentle warmth.
-
Paprika (1 teaspoon): Contributes color and a mild smoky note.
-
Garlic powder (1 teaspoon): Adds depth without overpowering the shrimp.
-
Cooking spray or olive oil (1 tablespoon): Helps the coating crisp in the oven.
For the Sweet Chili Mayo:
-
Mayonnaise (120 g / ½ cup)
-
Sweet chili sauce (80 ml / ⅓ cup)
-
Fresh lemon juice (1 tablespoon)
Serving Suggestions and Pairings
Baked coconut shrimp pairs beautifully with a variety of sides. Serve it alongside a crisp green salad with citrus dressing, fluffy jasmine rice, or roasted vegetables. For a party spread, place the shrimp on a platter with lime wedges and a bowl of sweet chili mayo at the center. The vibrant colors and aroma make it an instant crowd-pleaser.
Frequently Asked Questions
Can I make baked coconut shrimp ahead of time?
Yes, you can prepare baked coconut shrimp ahead of time with a few considerations. You can bread the shrimp up to 8 hours in advance and store them in a single layer in the refrigerator, tightly covered. This makes entertaining easier because all you need to do is bake them when guests arrive. However, for the best texture, it’s recommended to bake them just before serving. If you must bake them in advance, reheat them in a hot oven at 200°C / 400°F for 5–7 minutes to help restore crispness. Avoid microwaving, as it tends to make the coating soft.
Can I use frozen shrimp for this recipe?
Frozen shrimp work perfectly well for this recipe as long as they are properly thawed. Place the frozen shrimp in the refrigerator overnight or run them under cold water until thawed. Once thawed, pat them completely dry with paper towels. Excess moisture can prevent the coating from sticking and reduce crispness during baking. Using frozen shrimp can be a convenient and budget-friendly option, especially if fresh shrimp are not readily available in your area.
What can I use instead of panko breadcrumbs?
If you don’t have panko breadcrumbs, you can substitute regular breadcrumbs, though the texture will be slightly less airy. Another option is crushed cornflakes or crushed rice cereal for a gluten-free alternative, provided all other ingredients meet your dietary needs. These substitutes still deliver a satisfying crunch, especially when combined with shredded coconut. Keep in mind that different coatings may brown at different rates, so keep an eye on the shrimp as they bake.
How spicy is the sweet chili mayo?
The sweet chili mayo is mildly spicy, making it suitable for most palates. The sweetness of the chili sauce balances the gentle heat, while the mayonnaise adds creaminess. If you prefer a milder sauce, reduce the amount of sweet chili sauce and add a little more mayonnaise. For those who enjoy more heat, you can increase the sweet chili sauce slightly or add a pinch of chili flakes. The sauce is easily adjustable, which makes it perfect for serving a crowd with varying spice preferences.
Final Thoughts
Baked Coconut Shrimp with Sweet Chili Mayo is the kind of recipe that feels indulgent yet approachable, making it a wonderful addition to any home cook’s repertoire. It captures the essence of a beloved restaurant favorite while offering the comfort of knowing exactly what goes into your meal. Baking instead of frying allows the flavors to shine without feeling heavy, and the crisp coconut coating proves that oven-baked dishes can still deliver incredible texture.
This recipe is also a reminder of how a few simple ingredients can come together to create something truly special. The natural sweetness of coconut, the delicate flavor of shrimp, and the creamy tang of the dipping sauce form a harmony that feels both familiar and exciting. It’s a dish that invites creativity, whether you choose to serve it as an appetizer, a main course, or part of a larger spread.
Most importantly, this recipe is meant to be shared. It’s perfect for gatherings, family dinners, or even a quiet night when you want to treat yourself to something a little extra. Once you try it, you’ll find yourself returning to it again and again, not just for the flavor, but for the joy it brings to the table.
Print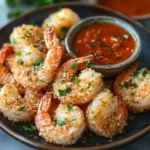
Irresistible Baked Coconut Shrimp with Sweet Chili Mayo Oven Magic
- Total Time: 35 minutes
- Yield: 4 servings
Description
A crispy, oven-baked shrimp recipe coated in coconut and panko, served with a creamy sweet chili dipping sauce that’s perfect for any occasion.
Ingredients
-
Large shrimp: 450 g / 1 lb, peeled and deveined
-
All-purpose flour: 60 g / ½ cup
-
Large eggs: 2, beaten
-
Unsweetened shredded coconut: 80 g / 1 cup
-
Panko breadcrumbs: 60 g / 1 cup
-
Salt: ¾ teaspoon
-
Black pepper: ½ teaspoon
-
Paprika: 1 teaspoon
-
Garlic powder: 1 teaspoon
-
Olive oil or cooking spray: 1 tablespoon
For the Sweet Chili Mayo
-
Mayonnaise: 120 g / ½ cup
-
Sweet chili sauce: 80 ml / ⅓ cup
-
Lemon juice: 1 tablespoon
Instructions
-
Preheat the oven to 220°C / 425°F and line a baking sheet with parchment paper.
-
Place flour in one bowl, beaten eggs in another, and combine coconut, panko, salt, pepper, paprika, and garlic powder in a third bowl.
-
Pat shrimp dry. Coat each shrimp in flour, dip into egg, then press into the coconut mixture.
-
Arrange shrimp on the baking sheet and lightly spray or brush with oil.
-
Bake for 12–15 minutes, flipping halfway, until golden and cooked through.
-
Mix mayonnaise, sweet chili sauce, and lemon juice in a bowl. Serve alongside the shrimp.
Notes
- Prep Time: 20 minutes
- Cook Time: 15 minutes