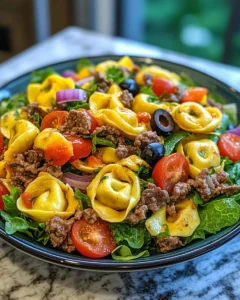
There are certain dishes that feel instantly familiar yet exciting at the same time, and this Cheesy Grinder Tortellini Salad is one of them. It’s the kind of recipe that fits effortlessly into so many moments: backyard gatherings, family potlucks, busy weeknights, or relaxed weekends when you want something comforting but fresh. Inspired by the bold flavors of a classic grinder sandwich and transformed into a creamy, cheesy pasta salad, this dish brings together hearty textures and vibrant flavors in every bite.
The inspiration behind this recipe comes from those iconic deli counters where everything smells incredible and every sandwich feels like a small celebration. Instead of bread, tender cheese-filled tortellini becomes the base, soaking up a rich, tangy dressing and mingling with crisp vegetables, savory protein, and generous amounts of cheese. The result is a satisfying salad that eats like a meal and always disappears fast.
Why You’ll Love This Cheesy Grinder Tortellini Salad
This recipe stands out because it strikes the perfect balance between indulgence and freshness. The tortellini provides a comforting, filling foundation, while crunchy vegetables and a zesty dressing keep everything light and refreshing. It’s easy to prepare, easy to customize, and even better after chilling, making it ideal for make-ahead meals.
Whether you’re serving it as a main dish or a hearty side, this salad has a way of pleasing everyone at the table. It’s rich without being heavy, cheesy without being overwhelming, and bold without being complicated.
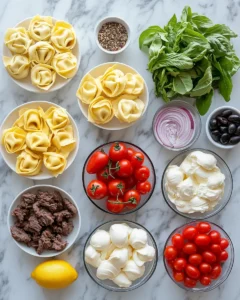
Ingredients for Cheesy Grinder Tortellini Salad
For the Salad
-
Cheese tortellini (fresh or refrigerated): 20 oz (570 g)
-
Cooked beef or turkey deli-style slices, chopped: 1½ cups (225 g)
-
Shredded mozzarella cheese: 1½ cups (170 g)
-
Provolone cheese, cubed: 1 cup (150 g)
-
Cherry tomatoes, halved: 1½ cups (225 g)
-
Crisp lettuce (romaine or iceberg), finely chopped: 2 cups (90 g)
-
Red onion, thinly sliced: ½ cup (75 g)
-
Banana peppers, sliced: ½ cup (60 g)
-
Black olives, sliced: ½ cup (75 g)
For the Creamy Grinder Dressing
-
Mayonnaise: ¾ cup (180 g)
-
Sour cream: ¼ cup (60 g)
-
Dijon mustard: 1 tbsp
-
Fresh lemon juice: 2 tbsp
-
Olive oil: 2 tbsp
-
Garlic powder: 1 tsp
-
Dried oregano: 1 tsp
-
Salt: ¾ tsp (or to taste)
-
Black pepper: ½ tsp
How to Make Cheesy Grinder Tortellini Salad
Step 1: Cook the Tortellini to Perfect Texture
Start by bringing a large pot of water to a rolling boil and season it generously with salt. This step is essential because it’s the only opportunity to season the tortellini from the inside out. Add the cheese tortellini and cook according to the package instructions, usually just a few minutes, until the pasta is tender yet still pleasantly firm. Avoid overcooking, as soft or bloated tortellini can fall apart once mixed with the dressing. The goal is a tender bite that holds its shape and texture throughout the salad.
Step 2: Cool and Drain the Pasta Properly
Once the tortellini is cooked, drain it immediately in a colander. Rinse briefly with cool water to stop the cooking process and prevent the pasta from continuing to soften. This quick rinse also removes excess starch, which helps the dressing cling evenly instead of becoming gummy. After rinsing, allow the tortellini to drain completely. Excess water can dilute the dressing, so taking a moment to let it dry makes a noticeable difference in flavor and consistency.
Step 3: Prepare the Creamy Grinder Dressing
In a large mixing bowl, combine the mayonnaise, sour cream, Dijon mustard, fresh lemon juice, olive oil, garlic powder, dried oregano, salt, and black pepper. Whisk until the mixture becomes smooth and creamy with no streaks remaining. This dressing is the heart of the salad, delivering tangy, savory, and slightly zesty notes that echo classic grinder flavors. Taste the dressing at this stage and adjust seasoning if needed. A balanced dressing now ensures a well-seasoned salad later.
Step 4: Coat the Tortellini Evenly
Add the fully cooled and drained tortellini directly into the bowl with the dressing. Using a spatula or large spoon, gently toss until every piece of tortellini is evenly coated. Take your time with this step, as even coverage ensures consistent flavor in every bite. The cheese-filled pasta absorbs the creamy dressing beautifully, forming the base of the salad and setting the stage for the remaining ingredients.

Step 5: Fold in the Signature Grinder Ingredients
Next, carefully fold in the chopped beef or turkey, shredded mozzarella cheese, provolone cubes, cherry tomatoes, red onion, banana peppers, and black olives. Mix gently to avoid breaking the tortellini or crushing the softer ingredients. This step is where the salad truly comes to life, combining creamy, savory, tangy, and crisp elements. The contrast of textures is intentional and creates a satisfying, hearty dish that feels indulgent yet fresh.
Step 6: Chill to Let the Flavors Develop
Once everything is combined, cover the bowl tightly and refrigerate the salad for at least 30 to 60 minutes. Chilling allows the flavors to meld together, enhancing the overall taste and depth of the dish. During this resting time, the tortellini absorbs the dressing while the vegetables release subtle juices that enrich the salad. If you have extra time, chilling for a bit longer can make the flavors even more pronounced.
Step 7: Add Lettuce Just Before Serving
Right before serving, gently stir in the chopped lettuce. Adding it at the last moment preserves its crisp texture and fresh appearance. This final step provides a refreshing crunch that balances the creamy components and keeps the salad from feeling too heavy. Mix lightly to distribute the lettuce without wilting it.
Step 8: Final Taste and Serve
Before serving, give the salad a final taste and adjust the seasoning if necessary. A pinch of salt, a crack of black pepper, or a small splash of lemon juice can brighten the flavors just before it hits the table. Serve the Cheesy Grinder Tortellini Salad chilled for the best texture and taste. Whether enjoyed immediately or after resting a bit longer, this method ensures a perfectly balanced, flavorful salad every time.
Tips for the Best Flavor and Texture
-
Cool the tortellini completely before mixing with the dressing to avoid excess oil separation.
-
Add lettuce last to keep it crisp and fresh.
-
Chill before serving—this salad tastes even better after resting.
-
Cut ingredients evenly so every bite has balanced flavor.
Serving Suggestions
This salad is hearty enough to serve as a main dish, especially on warm days when hot meals feel too heavy. It also pairs beautifully with simple sides like fresh fruit, baked potatoes, or warm flatbread. For gatherings, serve it in a large chilled bowl and garnish with extra cheese or freshly cracked black pepper.
Frequently Asked Questions
1. Can I make Cheesy Grinder Tortellini Salad ahead of time?
Absolutely, and in fact, this salad benefits from being made ahead. Preparing it a few hours in advance allows the tortellini to absorb the flavors of the creamy grinder dressing, resulting in a richer, more cohesive taste. If you plan to make it a day ahead, it’s best to leave out the lettuce until just before serving. This ensures the salad maintains its crunch and freshness. Store the salad in an airtight container in the refrigerator, and give it a gentle stir before serving to redistribute the dressing.
2. What type of tortellini works best for this recipe?
Cheese-filled tortellini is ideal because it complements the grinder-inspired flavors and enhances the creamy texture of the salad. Fresh or refrigerated tortellini tends to have a softer, more delicate bite, which works beautifully here. However, frozen tortellini can also be used—just be sure to cook it properly and cool it completely before mixing. Avoid overcooking, as mushy pasta will affect the overall texture of the dish.
3. Can I customize the ingredients?
One of the best things about this recipe is how customizable it is. You can swap or add vegetables based on what you enjoy or have on hand, such as cucumbers, bell peppers, or shredded carrots. The cheese can also be adjusted—cheddar, Monterey Jack, or a blend can all work well. As for protein, cooked beef or turkey are excellent options, but you can also use grilled chicken for a lighter variation.
4. How long does Cheesy Grinder Tortellini Salad last in the fridge?
When stored properly in an airtight container, this salad will keep well in the refrigerator for up to 3 days. The flavors continue to develop over time, but the texture is best within the first couple of days. If the salad seems slightly dry after chilling, you can refresh it with a spoonful of mayonnaise or a splash of lemon juice before serving.
Final Thoughts
Cheesy Grinder Tortellini Salad is more than just a pasta salad—it’s a full-flavored, satisfying dish that brings comfort and freshness together in one bowl. Every bite delivers creamy cheese, savory protein, crisp vegetables, and a tangy dressing that ties everything together beautifully. It captures the essence of a classic grinder while offering a modern, shareable twist that works for nearly any occasion.
What makes this recipe truly special is its versatility. It fits seamlessly into casual family meals, celebratory gatherings, and meal prep routines alike. You can serve it as a main dish on warm days, pack it for lunches, or place it at the center of a buffet table where it’s guaranteed to draw attention. The combination of textures and flavors keeps people coming back for seconds, and the simplicity of the preparation makes it accessible even for beginner cooks.
If you’re looking for a recipe that feels indulgent without being complicated, familiar yet exciting, this Cheesy Grinder Tortellini Salad deserves a place in your regular rotation. It’s the kind of dish that quickly becomes a favorite—not just because it tastes great, but because it brings people together around the table.
Print
Cheesy Grinder Tortellini Salad – A Must-Try Crowd Favorite
- Total Time: 30 minutes plus chilling
- Yield: 6–8 servings
Description
A creamy, bold pasta salad inspired by classic grinder flavors, perfect for gatherings or easy meals.
Ingredients
-
Cheese tortellini: 20 oz (570 g)
-
Cooked beef or turkey, chopped: 1½ cups (225 g)
-
Shredded mozzarella cheese: 1½ cups (170 g)
-
Provolone cheese, cubed: 1 cup (150 g)
-
Cherry tomatoes, halved: 1½ cups (225 g)
-
Lettuce, chopped: 2 cups (90 g)
-
Red onion, sliced: ½ cup (75 g)
-
Banana peppers: ½ cup (60 g)
-
Black olives: ½ cup (75 g)
-
Mayonnaise: ¾ cup (180 g)
-
Sour cream: ¼ cup (60 g)
-
Dijon mustard: 1 tbsp
-
Lemon juice: 2 tbsp
-
Olive oil: 2 tbsp
-
Garlic powder: 1 tsp
-
Dried oregano: 1 tsp
-
Salt: ¾ tsp
-
Black pepper: ½ tsp
Instructions
-
Cook tortellini in salted boiling water according to package instructions. Drain and cool.
-
Whisk mayonnaise, sour cream, mustard, lemon juice, olive oil, garlic powder, oregano, salt, and pepper.
-
Toss cooled tortellini with dressing until well coated.
-
Add beef or turkey, cheeses, tomatoes, onion, peppers, and olives. Mix gently.
-
Chill for at least 30 minutes.
-
Stir in lettuce just before serving.
Notes
-
Add lettuce right before serving for best texture.
-
Chill longer for deeper flavor.
-
Customize vegetables and cheese to taste.
- Prep Time: 20 minutes
- Cook Time: 10 minutes