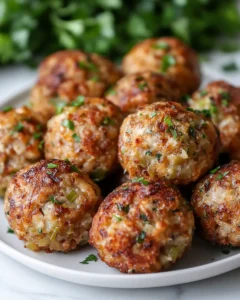
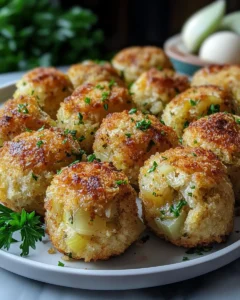
There’s something undeniably comforting about the aroma of caramelized onions mingling with the fresh scent of celery and herbs as they bake to golden perfection. Caramelized Onion & Celery Stuffing Balls are the ultimate embodiment of cozy, heartwarming flavors—perfect for a family gathering, a festive holiday like Thanksgiving, or even a quiet evening when you want to elevate a simple dinner.
This recipe was inspired by the classic stuffing that graces holiday tables across the country, reimagined in bite-sized form for convenience and elegance. Growing up, many of us remember those warm, soft mounds of stuffing sitting next to roasted turkey or chicken, and this recipe takes that nostalgia and transforms it into handheld, crowd-pleasing bites. Caramelization brings out the natural sweetness in onions, while the celery adds a subtle crunch and freshness, creating a perfect balance that is irresistible.
Whether you’re hosting a dinner party or preparing a side dish for a holiday feast, these stuffing balls are guaranteed to impress. They’re easy to make ahead of time, allowing you to focus on the main course while still offering a delicious starter or side dish that everyone will love.
Ingredients
-
4 cups day-old bread, cut into small cubes
-
2 large onions, thinly sliced
-
3 stalks celery, finely diced
-
4 tablespoons unsalted butter
-
2 cloves garlic, minced
-
1 teaspoon dried thyme
-
1 teaspoon dried sage
-
½ teaspoon dried rosemary
-
Salt and freshly ground black pepper, to taste
-
2 large eggs, lightly beaten
-
½ cup vegetable broth (or as needed for moisture)
-
2 tablespoons fresh parsley, chopped
-
¼ cup grated Parmesan cheese (optional for extra flavor)
Directions
-
Preheat the oven and prepare the baking sheet
Preheat your oven to 375°F (190°C). Line a baking sheet with parchment paper or a silicone mat to prevent sticking. This will make baking the stuffing balls easier and cleanup faster. -
Caramelize the onions
In a large skillet over medium heat, melt the butter. Add the sliced onions and cook slowly, stirring frequently, for about 20-25 minutes until they turn golden brown and sweetly fragrant. The key to perfect caramelization is patience—don’t rush this step. -
Cook the celery and garlic
Add the diced celery and minced garlic to the caramelized onions. Sauté for another 5-7 minutes until the celery softens slightly but still maintains a bit of crunch. Stir in the dried thyme, sage, rosemary, salt, and pepper. Allow the mixture to cool slightly before combining with the bread cubes. -
Combine the bread and aromatics
Place the bread cubes in a large mixing bowl. Add the caramelized onion and celery mixture. Toss gently to ensure the bread is evenly coated with the flavorful vegetables and herbs. -
Moisten and bind the mixture
Pour in the beaten eggs and vegetable broth, mixing gently. The mixture should be moist but not soggy; adjust with extra broth if necessary. Add the chopped parsley and Parmesan cheese, if using, and mix until well incorporated. -
Shape the stuffing balls
Using your hands or a small ice cream scoop, form the mixture into balls about 1.5 inches in diameter. Place them evenly spaced on the prepared baking sheet. -
Bake until golden
Bake in the preheated oven for 20-25 minutes, or until the tops are lightly browned and the balls hold their shape. For extra crispiness, you can turn them halfway through baking. -
Serve and enjoy
Remove from the oven and let cool slightly before serving. These stuffing balls are perfect as a side dish or appetizer, and they pair wonderfully with roasted meats, gravy, or a fresh salad.
Tips for Perfect Stuffing Balls
-
Use day-old bread: Slightly stale bread absorbs the flavors without turning mushy, ensuring your stuffing balls have a perfect texture.
-
Caramelize slowly: Rushing the onions will result in uneven browning and a less sweet flavor. Take your time for maximum depth.
-
Adjust herbs to taste: Feel free to experiment with fresh herbs or different combinations to suit your palate.
-
Make ahead: You can prepare the stuffing mixture a day in advance, store it in the fridge, and shape and bake just before serving.
-
Crispy outside, soft inside: For an extra golden crust, brush the tops lightly with melted butter before baking.
Variations and Add-Ins
One of the best things about stuffing balls is their versatility. Here are some ways to customize this recipe:
-
Vegetable boost: Add diced carrots, bell peppers, or mushrooms for extra flavor and nutrients.
-
Nutty crunch: Mix in toasted walnuts, pecans, or sunflower seeds for a delightful crunch.
-
Cheese lover’s version: Swap Parmesan for Gruyère or sharp cheddar for a richer, savory taste.
-
Vegan adaptation: Replace butter with olive oil and eggs with a flax egg (1 tablespoon flaxseed meal + 3 tablespoons water) for a vegan-friendly option.
-
Spicy twist: Add a pinch of red pepper flakes or smoked paprika for subtle heat and smokiness.
How to Serve
These Caramelized Onion & Celery Stuffing Balls are incredibly versatile and can elevate any meal:
-
As a holiday side dish: Perfect alongside roasted turkey, chicken, or even ham-free alternatives for a festive spread.
-
As an appetizer: Serve with a tangy cranberry sauce, honey mustard, or a balsamic glaze for dipping.
-
As part of a cozy dinner: Pair with a warm soup or salad for a comforting weeknight meal.
-
Party-friendly finger food: Their bite-sized shape makes them ideal for cocktail parties or family gatherings.
The Inspiration Behind This Recipe
Stuffing is a classic dish often associated with family gatherings, holidays, and comfort food memories. The transformation into bite-sized stuffing balls stems from a desire to make this traditional dish more versatile and accessible. Instead of serving a traditional casserole, these individual portions are perfect for dipping, sharing, or enjoying as a fun finger food.
The use of caramelized onions adds a subtle sweetness that balances the earthy notes of celery and herbs, creating layers of flavor in every bite. This recipe is also a nod to the resourcefulness often found in holiday cooking—turning simple ingredients into something extraordinary. It embodies the idea of bringing warmth, joy, and connection to the table, one small, delicious bite at a time.
Why You’ll Love These Stuffing Balls
-
Flavorful and comforting: The combination of caramelized onions, celery, and herbs delivers a rich, layered taste.
-
Easy to make ahead: Ideal for busy holidays or weeknight meals.
-
Versatile: Can be served as a side, appetizer, or party snack.
-
Customizable: Easily adapted for dietary preferences or to include favorite add-ins.
-
Crowd-pleasing: Everyone loves a golden, crispy, flavorful bite!
Pairing Suggestions
To elevate your meal, consider pairing these stuffing balls with:
-
Roasted meats: Turkey, chicken, or beef
-
Vegetarian mains: Stuffed squash, lentil loaf, or mushroom Wellington
-
Sauces and dips: Cranberry chutney, mushroom gravy, or a creamy garlic dip
-
Salads: Mixed greens with a vinaigrette or roasted winter vegetables
Storing and Reheating
-
Refrigeration: Store leftover stuffing balls in an airtight container in the fridge for up to 3 days. Reheat in the oven at 350°F (175°C) for 10-15 minutes until warmed through.
-
Freezing: Stuffing balls freeze beautifully. Arrange them on a baking sheet to freeze individually, then transfer to a freezer-safe bag or container. Bake from frozen at 375°F (190°C) for 25-30 minutes.
-
Make ahead: The mixture can be prepared a day in advance and kept in the fridge. Shape into balls right before baking for maximum freshness.
Frequently Asked Questions (FAQs)
1. Can I use fresh bread instead of day-old bread?
Yes, you can use fresh bread, but there are a few things to keep in mind. Fresh bread tends to absorb liquid more quickly, which can make your stuffing balls soggy if too much broth or egg is added. To prevent this, lightly toast the bread cubes in the oven for 5-10 minutes before combining them with the other ingredients. Toasting dries the bread slightly and mimics the texture of day-old bread, allowing it to soak up flavors while still maintaining a firm structure. This step also enhances the flavor, giving the stuffing balls a subtle nutty taste from the toasted edges.
2. Can I make these gluten-free?
Absolutely! These stuffing balls can easily be adapted for a gluten-free diet. Simply replace the regular bread with your favorite gluten-free variety. As with regular bread, slightly stale or toasted gluten-free bread works best to avoid a mushy texture. Many gluten-free breads have different absorption rates, so you may need to adjust the amount of vegetable broth slightly to achieve the right consistency. This ensures that the balls hold together perfectly while baking, with a deliciously tender interior and a crisp exterior.
3. Can I add other vegetables?
Yes! The recipe is very versatile, so you can include additional vegetables to suit your taste. Diced carrots, bell peppers, mushrooms, or even zucchini can add extra flavor, color, and nutrition to your stuffing balls. When adding vegetables, consider their moisture content and cooking time. For example, mushrooms release liquid as they cook, so sauté them separately to reduce excess moisture before mixing with the bread cubes. Carrots or bell peppers may need a few extra minutes to soften during sautéing. Experimenting with different vegetables allows you to create a customized version that reflects your personal preferences.
4. Are these suitable for meal prep?
Definitely! These stuffing balls are ideal for meal prep and can be made ahead of time. You can prepare the mixture a day or two in advance and store it in the fridge until you’re ready to bake. They also freeze exceptionally well, making them perfect for batch cooking or holiday preparation. Simply shape the balls, freeze them on a tray individually, then transfer them to a freezer-safe bag or container. When ready to enjoy, bake them directly from frozen, adjusting the cooking time slightly. This makes it easy to have a convenient, flavorful side dish ready whenever you need it.
5. Can I make these vegan or dairy-free?
Yes, by swapping butter with olive oil and using a flax egg (1 tablespoon flaxseed meal + 3 tablespoons water) instead of regular eggs, you can create a vegan-friendly version without sacrificing taste or texture.
Caramelized Onion & Celery Stuffing Balls Recipe
- Total Time: 55 minutes
- Yield: 20-24 stuffing balls 1x
Description
A warm, comforting twist on classic holiday stuffing, these bite-sized balls are packed with the sweet flavor of caramelized onions, fresh celery, and aromatic herbs. Perfect for festive gatherings, cozy dinners, or as a flavorful appetizer, they’re easy to make ahead and sure to impress.
Ingredients
-
4 cups day-old bread, cut into small cubes
-
2 large onions, thinly sliced
-
3 stalks celery, finely diced
-
4 tablespoons unsalted butter
-
2 cloves garlic, minced
-
1 teaspoon dried thyme
-
1 teaspoon dried sage
-
½ teaspoon dried rosemary
-
Salt and freshly ground black pepper, to taste
-
2 large eggs, lightly beaten
-
½ cup vegetable broth (or as needed for moisture)
-
2 tablespoons fresh parsley, chopped
-
¼ cup grated Parmesan cheese (optional)
Instructions
-
Preheat the oven to 375°F (190°C) and line a baking sheet with parchment paper.
-
In a large skillet, melt butter over medium heat. Add onions and cook slowly for 20-25 minutes until golden and caramelized.
-
Add celery and garlic, sauté for 5-7 minutes until slightly softened. Stir in thyme, sage, rosemary, salt, and pepper. Remove from heat and let cool slightly.
-
In a large bowl, combine bread cubes with the onion and celery mixture.
-
Add eggs and vegetable broth, mixing gently until the mixture is moist but not soggy. Stir in parsley and Parmesan if using.
-
Shape the mixture into 1.5-inch balls and place evenly on the prepared baking sheet.
-
Bake for 20-25 minutes until golden brown, turning halfway for even crispiness.
-
Remove from oven, let cool slightly, and serve warm.
Notes
-
Day-old bread works best to prevent sogginess.
-
Can be prepared a day ahead and refrigerated until baking.
-
Freeze unbaked balls for later use; bake directly from frozen.
-
Adjust herbs and add-ins to suit your taste preferences.
- Prep Time: 25 minutes
- Cook Time: 30 minutes