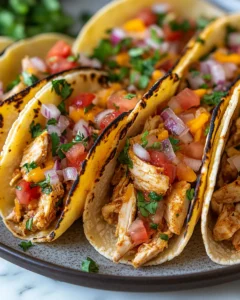
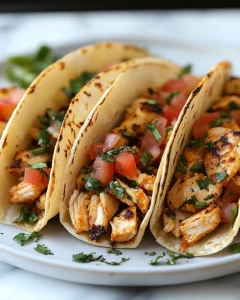
There’s something undeniably comforting about warm, cheesy tacos fresh from the oven. Cheesy Mini Baked Chicken Tacos are the kind of recipe that feels right at home on so many occasions—busy weeknights when you need something reliable, casual gatherings with friends, family movie nights, or even game-day spreads where finger foods shine. These mini tacos deliver all the bold, satisfying flavors of classic tacos, but in a compact, baked form that’s easy to serve and even easier to love.
This recipe was inspired by the idea of bringing everyone together around a shared tray of food—no fuss, no complicated steps, just simple ingredients transformed into something crave-worthy. Baking the tacos instead of frying keeps them lighter while still achieving that irresistible crisp shell. Paired with seasoned chicken and generous melted cheese, these mini tacos are proof that comfort food doesn’t have to be complicated to be unforgettable.
Why You’ll Love These Cheesy Mini Baked Chicken Tacos
These mini tacos check all the right boxes for home cooks of every skill level. First, they’re incredibly approachable. With everyday ingredients and straightforward steps, you can make them without stress. Second, they’re versatile. You can serve them as a main dish with sides or as an appetizer for a crowd. Their small size makes them perfect for sharing, sampling, and customizing with different toppings.
Another reason they stand out is texture. Baking the tacos upright allows the tortillas to crisp evenly while the cheese melts into the chicken filling, binding everything together. Each bite offers a contrast between crunchy shell, tender chicken, and gooey cheese. Finally, these tacos reheat beautifully, making them ideal for meal prep or leftovers the next day.
Ingredients Breakdown and Flavor Building
A great recipe starts with understanding how each ingredient contributes to the final result. Here’s what makes these Cheesy Mini Baked Chicken Tacos so flavorful and satisfying:
-
Chicken breast: Lean, tender, and perfect for absorbing seasoning. Using cooked, shredded chicken ensures even distribution in every taco.
-
Olive oil: Adds richness and helps the spices cling to the chicken.
-
Onion and garlic: These aromatics build a savory base that deepens the overall flavor.
-
Spices: Ground cumin, chili powder, smoked paprika, garlic powder, onion powder, salt, and black pepper work together to create a warm, balanced taco seasoning.
-
Tomato sauce: Adds moisture and a subtle tang that keeps the chicken filling juicy during baking.
-
Cheese: A blend of shredded cheddar and mozzarella (or Monterey Jack) delivers both flavor and that signature stretchy melt.
-
Mini tortillas: Small corn or flour tortillas crisp beautifully in the oven and hold the filling without falling apart.
Using measured ingredients ensures consistency every time, whether you’re cooking for two or feeding a crowd.
Ingredients (with Measurements)
-
2 cups cooked chicken breast, shredded
-
1 tablespoon olive oil
-
1 small onion, finely diced
-
2 cloves garlic, minced
-
1 teaspoon ground cumin
-
1 teaspoon chili powder
-
½ teaspoon smoked paprika
-
½ teaspoon garlic powder
-
½ teaspoon onion powder
-
½ teaspoon salt
-
¼ teaspoon black pepper
-
½ cup tomato sauce
-
1 ½ cups shredded cheddar cheese
-
1 cup shredded mozzarella or Monterey Jack cheese
-
16–18 mini corn or flour tortillas
Optional toppings for serving:
-
Shredded lettuce
-
Diced tomatoes
-
Sour cream
-
Chopped fresh herbs
-
Mild salsa
Tips for Perfect Mini Baked Tacos
-
Don’t overfill the tortillas. A modest amount of filling ensures the tacos crisp properly.
-
Packing the tacos closely together helps them stand upright while baking.
-
If you prefer extra crisp shells, lightly brush the tortillas with olive oil before filling.
-
Use freshly shredded cheese for better melting and flavor.
Serving Suggestions
These Cheesy Mini Baked Chicken Tacos pair beautifully with simple sides. A fresh salad, seasoned rice, or roasted vegetables all complement the rich, cheesy filling. For gatherings, arrange them on a large platter with a variety of toppings so everyone can customize their own.
They’re also great for lunchboxes or quick dinners. Simply reheat in the oven or air fryer to restore crispness.
Frequently Asked Questions
1. Can I make Cheesy Mini Baked Chicken Tacos ahead of time?
Yes, this recipe is very make-ahead friendly. You can prepare the chicken filling up to two days in advance and store it in an airtight container in the refrigerator. When you’re ready to serve, simply warm the filling slightly, assemble the tacos, and bake them fresh. This approach is especially helpful when planning for gatherings or busy evenings. While fully assembled tacos can be refrigerated for a few hours before baking, it’s best to bake them just before serving to maintain crisp tortillas and perfectly melted cheese.
2. What type of tortillas work best for this recipe?
Both mini corn and mini flour tortillas work well, but they offer slightly different results. Corn tortillas provide a more traditional taco flavor and crisp up nicely in the oven. Flour tortillas tend to be softer inside with a gentle crunch on the edges. The key is to warm them briefly before filling so they don’t crack. Choosing high-quality, fresh tortillas will make a noticeable difference in texture and taste.
3. How do I keep the tacos crispy after baking?
To keep the tacos crispy, allow them to cool slightly on a wire rack instead of leaving them in the hot baking dish. This prevents steam from softening the shells. If you’re reheating leftovers, use an oven or air fryer rather than a microwave. Reheating at 180°C (350°F) for 8–10 minutes will help restore their crisp texture without drying out the filling.
4. Can I customize the filling without changing the recipe too much?
Absolutely. This recipe is a great base for customization. You can add finely chopped bell peppers, corn kernels, or cooked beans to the chicken mixture for extra texture and flavor. If you enjoy a little heat, a pinch of crushed chili flakes or a mild chili sauce can be stirred into the filling. Just be mindful not to add too much moisture, as that can prevent the tortillas from crisping properly during baking.
Final Thoughts
Cheesy Mini Baked Chicken Tacos are the kind of recipe that quickly becomes a household favorite. They strike a perfect balance between comfort and convenience, offering big flavor in a small, shareable package. Whether you’re cooking for your family, entertaining guests, or simply looking for a reliable recipe to add to your rotation, these tacos deliver every time.
What makes this dish truly special is its adaptability. You can keep it simple with classic toppings or turn it into a build-your-own taco experience that encourages creativity at the table. The baked preparation keeps things lighter and less messy, while still delivering that satisfying crunch and melt that taco lovers crave.
More than anything, this recipe is about bringing people together. A tray of golden, cheesy mini tacos invites conversation, laughter, and second helpings. It’s the kind of food that disappears quickly, leaving behind happy memories and requests for the recipe. Once you try these Cheesy Mini Baked Chicken Tacos, you’ll understand why they deserve a permanent spot in your kitchen repertoire.
Print
Cheesy Mini Baked Chicken Tacos
- Total Time: 40 minutes
- Yield: 16–18 mini tacos 1x
Description
A fun, oven-baked twist on classic chicken tacos, packed with seasoned chicken and melted cheese in crispy mini tortillas.
Ingredients
-
2 cups cooked chicken breast, shredded
-
1 tablespoon olive oil
-
1 small onion, finely diced
-
2 cloves garlic, minced
-
1 teaspoon ground cumin
-
1 teaspoon chili powder
-
½ teaspoon smoked paprika
-
½ teaspoon garlic powder
-
½ teaspoon onion powder
-
½ teaspoon salt
-
¼ teaspoon black pepper
-
½ cup tomato sauce
-
1 ½ cups shredded cheddar cheese
-
1 cup shredded mozzarella or Monterey Jack cheese
-
16–18 mini corn or flour tortillas
Instructions
-
Preheat oven to 190°C (375°F) and lightly grease a baking dish.
-
Heat olive oil in a skillet over medium heat and cook onion until soft.
-
Add garlic and cook briefly until fragrant.
-
Stir in shredded chicken, spices, salt, and pepper.
-
Add tomato sauce and cook for 2–3 minutes.
-
Combine cheeses in a bowl.
-
Fill warmed tortillas with chicken mixture and cheese.
-
Stand tortillas upright in the baking dish.
-
Sprinkle remaining cheese on top.
-
Bake for 18–22 minutes until crisp and golden.
Notes
- Prep Time: 15 minutes
- Cook Time: 25 minutes