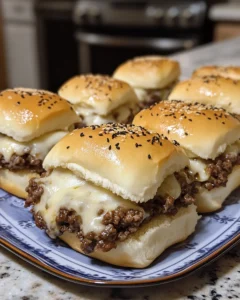
There are certain recipes that don’t need a special occasion—they become the occasion. Cheesy White Trash Sliders are exactly that kind of comfort food. They’re the sliders you make on game day when everyone crowds the kitchen, the ones you bake late on a cozy weekend evening, and the ones that somehow disappear faster than anything else on the table. Warm, cheesy, savory, and unapologetically indulgent, these sliders are designed for sharing, yet everyone secretly wants their own pan.
The inspiration behind this recipe comes from classic Midwestern potluck food—simple ingredients, bold flavors, and zero pretension. These sliders don’t try to be fancy; they aim to be memorable. They’re built around seasoned ground beef, melty cheese, and soft rolls baked together until golden and irresistible. Once you make them, they’ll earn a permanent place in your repeat-recipe rotation.
Why These Sliders Are So Addictive
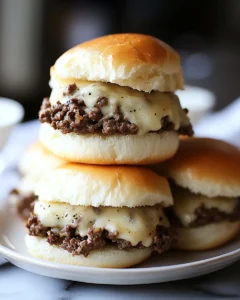
Cheesy White Trash Sliders hit every craving at once. They’re savory, creamy, hearty, and satisfying without requiring complicated steps or specialty ingredients. What really sets them apart is how the flavors come together during baking: the beef stays juicy, the cheese melts into every corner, and the rolls absorb just enough richness to stay soft while developing a lightly crisp top.
Another reason these sliders are so beloved is their versatility. They’re equally perfect as a casual dinner, a party appetizer, or a make-ahead dish for busy nights. You can customize them with different cheeses, seasonings, or add-ins, but the classic version is hard to beat. They’re nostalgic, comforting, and endlessly crowd-pleasing.
Ingredients You’ll Need
To make these sliders exactly right, stick with straightforward ingredients that deliver maximum flavor.
-
Ground beef – 2 pounds (80/20 for best juiciness)
-
Yellow onion – 1 large, finely diced
-
Garlic – 4 cloves, minced
-
Cream cheese – 8 ounces, softened
-
Shredded cheddar cheese – 2 cups
-
Shredded mozzarella cheese – 1½ cups
-
Mayonnaise – ½ cup
-
Dijon-style mustard – 2 tablespoons
-
Salt – 2 teaspoons
-
Black pepper – 1½ teaspoons
-
Garlic powder – 1 teaspoon
-
Onion powder – 1 teaspoon
-
Soft slider rolls – 24 rolls (Hawaiian-style or similar)
-
Unsalted butter – 6 tablespoons, melted
-
Sesame seeds – 1 tablespoon (optional)
Each ingredient plays a role, from the richness of the cheeses to the soft rolls that hold everything together.
How to Make Cheesy White Trash Sliders
Making Cheesy White Trash Sliders is less about precision cooking and more about building layers of flavor that come together beautifully in the oven. Each step plays a role in creating sliders that are rich, creamy, and irresistibly satisfying. Taking a little care during preparation ensures the final result is perfectly balanced—never greasy, never dry, and always packed with flavor.
Step 1: Cook the Beef
Start by preheating your oven to 350°F (175°C) so it’s ready when the sliders are assembled. Heat a large skillet over medium heat and add the ground beef along with the finely diced onion. Cooking the onion directly with the beef allows its natural sweetness to soften and blend into the meat rather than standing out as a separate flavor. As the beef cooks, use a wooden spoon or spatula to break it into small, even crumbles. This helps ensure that every slider gets a consistent amount of filling.
Allow the beef to cook for about 8–10 minutes, stirring occasionally, until it is fully browned and no pink remains. The onion should be soft and translucent at this stage. Add the minced garlic and cook for an additional 30 seconds, just until fragrant. Garlic burns quickly, so this brief cooking time is enough to release its flavor without bitterness. Once finished, carefully drain off any excess fat. This step is essential for preventing greasy sliders and keeping the filling rich but balanced. Set the cooked beef mixture aside while you prepare the cheesy base.
Step 2: Make the Cheesy Filling
In a large mixing bowl, combine the softened cream cheese, shredded cheddar cheese, shredded mozzarella cheese, mayonnaise, and mustard. The cream cheese should be fully softened so it blends smoothly without lumps. Stir the mixture until it becomes thick, creamy, and evenly combined. This base is what gives the sliders their signature richness and ensures the filling stays cohesive when baked.
Next, add the cooked beef mixture to the bowl along with the salt, black pepper, garlic powder, and onion powder. Mix thoroughly until the meat is evenly coated and the seasonings are well distributed. The result should be a creamy, hearty filling where every bite contains beef, cheese, and seasoning in perfect proportion. This step is where the sliders truly come together, so take a moment to scrape the sides and bottom of the bowl to ensure nothing is left unmixed.
Step 3: Assemble the Sliders
Using a long serrated knife, carefully slice the slider rolls in half horizontally, keeping the rolls connected if possible. This makes assembly faster and helps keep everything aligned while baking. Place the bottom halves of the rolls into a large greased baking dish, fitting them snugly together.
Spread the beef and cheese mixture evenly over the rolls, making sure to reach the edges and corners. An even layer ensures that every slider is equally filled and prevents dry spots. Once the filling is spread out, gently place the top halves of the rolls back over the mixture, pressing lightly so everything holds together.
Step 4: Butter and Bake
Brush the tops of the rolls generously with melted butter. This step adds flavor and helps the rolls bake up golden and slightly crisp on top while staying soft inside. If desired, sprinkle sesame seeds over the buttered tops for a classic slider finish.
Cover the baking dish loosely with foil and bake for 20 minutes. This allows the filling to heat through and the cheese to melt without over-browning the bread. After 20 minutes, remove the foil and return the sliders to the oven for another 10–15 minutes. During this final stage, the tops will turn golden brown and the filling will become hot and bubbly.
Step 5: Serve Hot
Once baked, remove the sliders from the oven and let them rest for about 5 minutes. This short rest allows the filling to set slightly, making the sliders easier to slice and serve. Cut along the roll lines and serve while warm and gooey for the best texture and flavor. These sliders are at their absolute best straight from the oven, when the cheese is melted and every bite is rich and comforting.
Serving Suggestions
These sliders shine on their own, but they also pair beautifully with simple sides. Serve them with baked potato wedges, coleslaw, or a crisp green salad to balance the richness. For gatherings, set them out with pickles and crunchy vegetables so guests can grab and go.
FAQs About Cheesy White Trash Sliders
1. Can I make these sliders ahead of time?
Yes, these sliders are excellent for making ahead, which is one of the reasons they’re so popular for gatherings. You can fully assemble the sliders—beef filling, rolls, and all—up to 24 hours in advance. Cover the baking dish tightly with foil and refrigerate. When ready to bake, let the dish sit at room temperature for about 20 minutes before placing it in the oven. This helps ensure even heating. You may need to add an extra 5–10 minutes to the baking time if they’re still chilled. The flavors actually deepen as they rest, making them even more delicious.
2. What type of cheese works best for this recipe?
Cheddar and mozzarella are a classic pairing because they balance sharp flavor with excellent meltability. Cheddar provides boldness, while mozzarella creates that irresistible stretch. You can substitute or add other cheeses like Colby Jack or Monterey Jack for a slightly milder profile. Avoid very hard cheeses alone, as they don’t melt as smoothly. The cream cheese is essential—it creates a rich, cohesive filling that keeps the sliders moist even after reheating.
3. How do I keep the sliders from getting soggy?
The key to avoiding soggy sliders is managing moisture. First, be sure to drain excess fat from the cooked beef thoroughly. Second, don’t overload the filling; spreading it evenly ensures the rolls absorb just enough richness without becoming saturated. Baking uncovered for the final portion allows steam to escape and helps the tops firm up. If you’re reheating leftovers, use the oven rather than the microwave to maintain texture.
4. Are these sliders good for leftovers and reheating?
Absolutely. Cheesy White Trash Sliders reheat surprisingly well. Store leftovers in an airtight container in the refrigerator for up to three days. To reheat, place them in a covered baking dish at 325°F (165°C) for about 15 minutes, or until warmed through. This method keeps the bread soft and the filling creamy. Microwaving works in a pinch, but the oven delivers better texture and flavor consistency.
Final Thoughts
Cheesy White Trash Sliders are proof that some of the best recipes come from keeping things simple. They don’t rely on trendy ingredients or complicated techniques. Instead, they focus on comfort, familiarity, and bold, satisfying flavors that bring people together. Whether you’re feeding a hungry family, hosting friends, or just craving something indulgent after a long day, these sliders deliver every time.
What makes this recipe truly special is how adaptable it is. You can stick to the classic version and enjoy it exactly as written, or you can tweak it to suit your preferences without losing its soul. Add a little heat, swap cheeses, or serve them with different sides—the core recipe remains reliable and forgiving. That’s the mark of a dish worth making on repeat.
There’s also something deeply nostalgic about pulling a pan of sliders out of the oven, slicing them apart, and watching the cheese stretch as they’re served. It’s comfort food in its purest form: warm, generous, and meant to be shared. Once you try these Cheesy White Trash Sliders, you’ll understand why they’ve earned their place as a go-to favorite that never disappoints.
Print
Cheesy White Trash Sliders You’ll Make on Repeat
- Total Time: 55 minutes
- Yield: 24 sliders
Description
A rich, cheesy, baked slider recipe that’s easy to make, endlessly satisfying, and perfect for sharing.
Ingredients
-
Ground beef – 2 pounds
-
Yellow onion – 1 large, finely diced
-
Garlic – 4 cloves, minced
-
Cream cheese – 8 ounces, softened
-
Shredded cheddar cheese – 2 cups
-
Shredded mozzarella cheese – 1½ cups
-
Mayonnaise – ½ cup
-
Dijon-style mustard – 2 tablespoons
-
Salt – 2 teaspoons
-
Black pepper – 1½ teaspoons
-
Garlic powder – 1 teaspoon
-
Onion powder – 1 teaspoon
-
Soft slider rolls – 24 rolls
-
Unsalted butter – 6 tablespoons, melted
-
Sesame seeds – 1 tablespoon (optional)
Instructions
-
Preheat oven to 350°F (175°C).
-
Cook ground beef and onion in a skillet over medium heat until browned; add garlic and cook briefly. Drain fat.
-
Mix cream cheese, cheddar, mozzarella, mayonnaise, and mustard until smooth.
-
Stir in beef mixture and seasonings until fully combined.
-
Place bottom halves of rolls in a greased baking dish and spread filling evenly.
-
Add top halves of rolls, brush with melted butter, and sprinkle with sesame seeds if desired.
-
Cover and bake for 20 minutes, then uncover and bake 10–15 minutes until golden.
-
Rest briefly, slice, and serve warm.
Notes
- Prep Time: 20 minutes
- Cook Time: 35 minutes