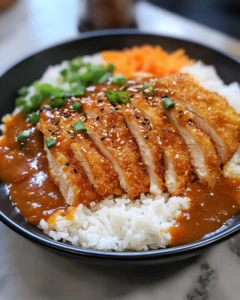
There’s something deeply comforting about a warm plate of Chicken Katsu Curry served over fluffy rice. It’s the kind of meal that feels like a reward at the end of a long day, perfect for a cozy evening at home or a special weekend dinner when you want something satisfying but familiar. This dish has a way of bringing people together—whether it’s shared at the table with family or recreated after tasting it at a favorite restaurant.
The inspiration behind this recipe comes from the balance it strikes between textures and flavors. Crispy, golden chicken contrasts beautifully with a rich, gently spiced curry sauce that feels both hearty and soothing. Over time, this recipe has been refined to be approachable for home cooks while still delivering that irresistible restaurant-style experience. Once you make it, it’s easy to see why so many people can’t stop talking about it.
Why This Chicken Katsu Curry Is So Popular
Chicken Katsu Curry has earned its devoted following because it hits all the right notes. The crunch of the breaded chicken provides instant satisfaction, while the curry sauce adds warmth, depth, and just enough spice to keep things interesting. Unlike many complex curries, this one is mild enough for most palates yet layered enough to feel special.
Another reason people love this dish is its versatility. It works just as well for a casual weeknight dinner as it does for entertaining guests. The components can even be prepared ahead of time, making it a practical option without sacrificing flavor. Above all, it’s comfort food that feels elevated—simple ingredients transformed into something memorable.
Ingredients You’ll Need
For the Chicken Katsu
-
4 boneless, skinless chicken breasts (about 600 g / 1.3 lb total)
-
1 teaspoon salt
-
½ teaspoon black pepper
-
½ cup all-purpose flour (60 g)
-
2 large eggs
-
1 cup panko breadcrumbs (50 g)
-
¾ cup neutral cooking oil for frying (180 ml)
For the Curry Sauce
-
2 tablespoons vegetable oil
-
1 large onion, finely chopped (200 g)
-
2 medium carrots, diced (150 g)
-
2 cloves garlic, minced
-
1 tablespoon grated fresh ginger
-
3 tablespoons curry powder
-
2 tablespoons all-purpose flour (16 g)
-
3 cups chicken stock (720 ml)
-
1 tablespoon soy sauce
-
1 tablespoon honey or sugar
-
Salt to taste
For Serving
-
3 cups cooked short-grain or medium-grain rice (about 450 g cooked)
-
Optional garnish: sliced green onions or sesame seeds
Tips for Perfect Chicken Katsu Curry
-
Even thickness matters: Pounding the chicken ensures even cooking and a juicy interior.
-
Use panko breadcrumbs: They create a lighter, crunchier coating than regular breadcrumbs.
-
Don’t rush the curry: Letting it simmer allows the flavors to deepen and meld beautifully.
-
Serve immediately: Chicken katsu is best enjoyed fresh while the coating is still crisp.
Frequently Asked Questions
1. Can I bake the chicken instead of frying it?
Yes, baking is an option if you prefer a lighter method. Preheat your oven to 200°C (400°F). Place the breaded chicken on a wire rack set over a baking sheet, lightly spray or brush with oil, and bake for 20–25 minutes, flipping halfway through. While it won’t be quite as crispy as frying, it will still be delicious and satisfying.
2. What type of curry powder works best for this recipe?
A mild or medium curry powder works best, especially if you’re serving a wide range of palates. Look for a blend that includes turmeric, coriander, cumin, and a hint of sweetness. If you enjoy more spice, you can add a pinch of chili powder or extra curry powder to adjust the heat level.
3. Can I make the curry sauce ahead of time?
Absolutely. The curry sauce can be made up to two days in advance and stored in an airtight container in the refrigerator. In fact, the flavor often improves as it sits. Reheat gently on the stovetop, adding a splash of stock or water if it thickens too much.
4. What’s the best rice to serve with Chicken Katsu Curry?
Short-grain or medium-grain rice is ideal because it has a slightly sticky texture that pairs well with the sauce. However, if you only have long-grain rice on hand, it will still work. The key is to cook it properly so it’s fluffy and not mushy.
Final Thoughts
Chicken Katsu Curry is more than just a meal—it’s an experience that combines comfort, texture, and rich flavor in every bite. The crispiness of the chicken contrasts beautifully with the smooth, savory curry sauce, creating a balance that keeps people coming back for more. It’s the kind of dish that feels indulgent yet approachable, making it perfect for both new cooks and seasoned home chefs.
What truly sets this recipe apart is its adaptability. You can tweak the spices, adjust the thickness of the sauce, or experiment with different sides to make it your own. Despite its impressive presentation, the process is straightforward, proving that restaurant-quality food doesn’t have to be complicated. Each step builds toward a final dish that looks and tastes like something special.
Whether you’re cooking for loved ones or treating yourself to a comforting homemade dinner, this Chicken Katsu Curry delivers on every level. It’s warm, filling, and deeply satisfying—exactly the kind of recipe that earns a permanent place in your rotation. Once you try it, you’ll understand why everyone is obsessed.
Print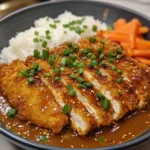
Chicken Katsu Curry Everyone Is Obsessed With
- Total Time: 55 minutes
- Yield: 4 servings 1x
Description
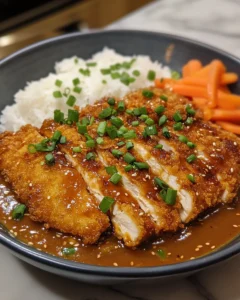
A comforting and satisfying dish featuring crispy breaded chicken served with a rich, flavorful curry sauce over warm rice.
Ingredients
-
4 boneless, skinless chicken breasts (about 600 g / 1.3 lb)
-
1 teaspoon salt
-
½ teaspoon black pepper
-
½ cup all-purpose flour (60 g)
-
2 large eggs
-
1 cup panko breadcrumbs (50 g)
-
¾ cup neutral cooking oil (180 ml)
-
2 tablespoons vegetable oil
-
1 large onion, finely chopped (200 g)
-
2 medium carrots, diced (150 g)
-
2 cloves garlic, minced
-
1 tablespoon grated fresh ginger
-
3 tablespoons curry powder
-
2 tablespoons all-purpose flour (16 g)
-
3 cups chicken stock (720 ml)
-
1 tablespoon soy sauce
-
1 tablespoon honey or sugar
-
Salt to taste
-
3 cups cooked rice (about 450 g cooked)
Instructions
-
Pound chicken breasts to even thickness and season with salt and pepper.
-
Dredge chicken in flour, dip in eggs, then coat with panko breadcrumbs.
-
Fry chicken in oil over medium heat for 4–5 minutes per side until golden and cooked through. Set aside.
-
In a saucepan, heat vegetable oil and sauté onion and carrots until softened.
-
Add garlic and ginger, cooking briefly until fragrant.
-
Stir in curry powder and flour, cooking for 1–2 minutes.
-
Gradually whisk in chicken stock, then add soy sauce and honey. Simmer until thickened.
-
Slice chicken and serve over rice with curry sauce poured on top.
Notes
- Prep Time: 25 minutes
- Cook Time: 30 minutes