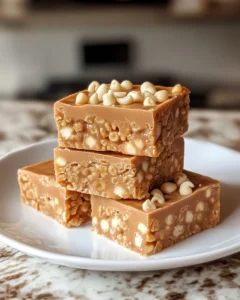
There’s something undeniably comforting about a treat that combines rich, creamy peanut butter with the playful crunch of Rice Krispies. This Crispy & Creamy Peanut Butter Rice Krispies Fudge is the perfect dessert for a cozy evening at home, a holiday gathering, or a festive celebration with friends and family. The moment you bite into it, you experience the satisfying crunch of crispy cereal paired with the smooth, melt-in-your-mouth peanut butter sweetness that everyone loves.
The inspiration for this recipe comes from childhood memories of helping in the kitchen during the holidays, stirring big pots of marshmallow and peanut butter while tasting little nibbles along the way. Over time, this simple yet indulgent treat became a tradition in many homes—a crowd-pleaser that brings smiles to all ages. Easy to make, irresistibly delicious, and ideal for sharing, this fudge has the power to turn any ordinary day into something special.
Ingredients
-
3 cups Rice Krispies cereal
-
1 cup creamy peanut butter
-
1 can (14 oz) sweetened condensed milk
-
2 cups white chocolate chips
-
1 teaspoon vanilla extract
-
¼ teaspoon salt
-
Optional: ½ cup chopped peanuts for extra crunch
Directions
Prepare the Pan
Start by preparing your baking pan. Take an 8×8-inch square pan and line it with parchment paper. Make sure to leave a generous overhang on two opposite sides; this will make it much easier to lift the fudge out later without breaking it. Lightly grease the parchment paper with a small amount of butter or non-stick cooking spray to prevent the fudge from sticking. A well-prepared pan is key to achieving clean, even squares and will save you frustration when it’s time to remove the fudge. Take your time here—lining and greasing the pan thoroughly ensures a smooth, easy process later.
Melt the Peanut Butter Mixture
Next, move to a medium-sized saucepan and set it over low heat. Add 1 cup of creamy peanut butter along with a full 14-ounce can of sweetened condensed milk. It’s important to use low heat here to avoid scorching or separating the mixture. Stir continuously with a heat-resistant spatula or wooden spoon. The goal is to achieve a perfectly smooth and fully blended mixture, free of lumps. As you stir, you’ll notice the peanut butter gradually loosening and combining seamlessly with the condensed milk, creating a glossy, thick mixture. Once fully blended, remove the saucepan from the heat and add 1 teaspoon of vanilla extract and ¼ teaspoon of salt. Stir well to ensure the flavors are evenly distributed. This mixture forms the rich, creamy base of your fudge, so patience here pays off in flavor and texture.
Add White Chocolate Chips
While the peanut butter mixture is still warm, it’s time to incorporate the white chocolate chips. Add 2 cups of white chocolate chips directly into the saucepan. Using a spatula, fold them in gently. The residual heat from the peanut butter mixture will melt the chips, creating a luxuriously smooth, creamy consistency. Take your time to ensure every chip is fully melted and blended. This step is crucial because the white chocolate not only adds sweetness but also gives the fudge its characteristic creamy texture, which contrasts beautifully with the crispiness of the cereal. If some chips take a little longer to melt, you can place the pan back over low heat for a few seconds, stirring continuously until fully incorporated.
Mix in Rice Krispies
Now comes the fun part: adding the Rice Krispies cereal. Gradually fold in 3 cups of Rice Krispies, making sure every piece is coated with the warm, creamy peanut butter and white chocolate mixture. Be gentle—stirring too vigorously can crush the cereal and compromise that satisfying crunch that makes this fudge so special. Use a folding motion to preserve the light, airy texture of the cereal while ensuring even coating. At this stage, the mixture should be thick but pliable, with each Rice Krispie enveloped in creamy sweetness.
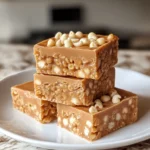
Add Optional Peanuts
For those who love an extra layer of texture, fold in ½ cup of chopped peanuts. This step is optional, but the added crunch complements the softness of the fudge beautifully and enhances the peanut flavor. Be sure to distribute the peanuts evenly throughout the mixture so that every bite contains a bit of crunch and added nutty goodness. This optional step allows you to customize the fudge to your preference, making it uniquely yours.
Transfer to Pan
Once all ingredients are fully incorporated, transfer the mixture into the prepared baking pan. Use a spatula or the back of a spoon to press the mixture down evenly. Press firmly but gently to compact the fudge without crushing the cereal. Smooth the top as much as possible to ensure even squares later. A flat, well-pressed top also helps the fudge set more uniformly in the fridge. Don’t rush this step—taking the time to distribute the mixture evenly ensures that the fudge looks as good as it tastes.
Chill to Set
Place the pan in the refrigerator and allow the fudge to chill for at least 2 hours, or until it becomes firm to the touch. If you’re short on time, you can place the pan in the freezer for 30–40 minutes, which speeds up the setting process. Chilling is crucial because it allows the fudge to solidify, making it easier to cut into clean squares without crumbling. Resist the urge to slice it too early; the fudge will be soft and sticky if not fully set.
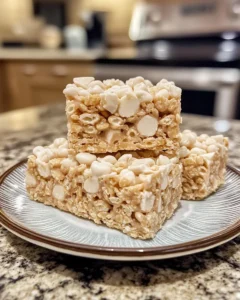
Slice and Serve
After the fudge has set, carefully lift it from the pan using the parchment overhang. Place it on a cutting board and slice into squares or rectangles using a sharp knife. For neat cuts, you can lightly grease the knife or warm it under hot water and dry it before slicing. Arrange the fudge on a serving platter and enjoy immediately, or store in an airtight container in the refrigerator for up to a week. These squares are perfect for sharing with friends and family, gifting, or simply indulging in a delicious treat anytime.
Tips for Perfect Peanut Butter Rice Krispies Fudge
-
Use creamy peanut butter: This ensures a smooth, luscious fudge texture. Chunky peanut butter can make mixing difficult and uneven.
-
Don’t overheat the mixture: Keep the heat low while melting to prevent scorching the peanut butter or condensed milk.
-
Press firmly into the pan: This helps the fudge hold together and makes slicing easier.
-
Customize your crunch: Experiment by adding mini chocolate chips, butterscotch chips, or even a swirl of Nutella for added flavor.
Why This Recipe Works
The magic of this fudge lies in its combination of textures and flavors. The creamy peanut butter and sweetened condensed milk create a smooth, rich base that melts in your mouth. The white chocolate adds a touch of sweetness that balances the salty undertones of the peanut butter. And the Rice Krispies cereal contributes a playful crunch that makes each bite satisfying and fun. It’s a recipe that doesn’t just taste good—it evokes memories, comforts the soul, and brings people together.
Occasions to Share This Fudge
-
Holiday gatherings: Perfect for Thanksgiving, Christmas, or Hanukkah dessert tables.
-
Birthday parties: A sweet addition to a candy buffet or as a homemade gift.
-
Potlucks and school events: Easy to make in batches and loved by kids and adults alike.
-
Cozy nights at home: Pair with a cup of hot chocolate or coffee for a relaxing treat.
Storage and Serving Suggestions
-
Store in an airtight container in the refrigerator for up to 7 days.
-
For longer storage, freeze in single layers between parchment paper for up to 2 months.
-
Serve chilled or slightly softened at room temperature for a melt-in-your-mouth experience.
Variations to Try
-
Chocolate Swirl Fudge: Drizzle melted dark chocolate over the top before chilling for a visually stunning effect.
-
Nutty Crunch Fudge: Add toasted almonds, cashews, or pecans for added texture.
-
Mini Marshmallow Fudge: Fold in mini marshmallows for an extra layer of softness and sweetness.
-
Salted Caramel Fudge: Add a layer of caramel sauce on top before refrigerating for a decadent twist.
-
Cereal Mix-In: Swap Rice Krispies for Cocoa Krispies or a combination of cereals for a fun flavor twist.
Why You Should Try This Recipe
This Crispy & Creamy Peanut Butter Rice Krispies Fudge is more than just a sweet treat—it’s an experience. Every bite delivers the perfect balance of creamy, sweet, and crunchy textures. It’s easy enough for beginners, yet impressive enough to share with family and friends during special occasions. Making this fudge is a fun and nostalgic way to bring people together, whether it’s for a festive holiday celebration or a simple night at home.
With minimal ingredients, straightforward steps, and a rewarding outcome, this fudge is designed to make anyone feel like a baking pro. The rich peanut butter flavor, coupled with the playful crunch of Rice Krispies, ensures it will be a hit every time.
Bring a batch to your next gathering, package some for neighbors, or enjoy a square or two yourself—this fudge is designed to spread joy and indulgence with every bite.
Frequently Asked Questions
Can I make this fudge ahead of time?
Absolutely! This fudge is perfect for making in advance. Prepare it a day or two ahead, refrigerate until firm, and slice just before serving. It’s a great option for holiday planning or potlucks.
Can I use natural peanut butter?
Yes, but natural peanut butter can be slightly runnier, so reduce the condensed milk by 1–2 tablespoons to maintain the right consistency.
Can I make this fudge without white chocolate?
Yes. The white chocolate adds creaminess and sweetness, but you can replace it with more peanut butter or milk chocolate chips depending on your preference.
How do I store leftover fudge?
Store leftovers in an airtight container in the fridge for up to one week. For longer storage, freeze in single layers with parchment paper in between for up to two months.
Crispy & Creamy Peanut Butter Rice Krispies Fudge
- Total Time: 2 hours 25 minutes (including chilling)
- Yield: 16–20 squares 1x
Description
This Crispy & Creamy Peanut Butter Rice Krispies Fudge is the perfect treat for cozy evenings, festive holidays, or any time you crave a sweet, crunchy indulgence. With its rich peanut butter flavor, smooth white chocolate, and playful Rice Krispies crunch, this fudge brings back nostalgic memories of childhood kitchen adventures. Easy to make, shareable, and irresistibly delicious, it’s a recipe that will quickly become a favorite in your household.
Ingredients
-
3 cups Rice Krispies cereal
-
1 cup creamy peanut butter
-
1 can (14 oz) sweetened condensed milk
-
2 cups white chocolate chips
-
1 teaspoon vanilla extract
-
¼ teaspoon salt
-
Optional: ½ cup chopped peanuts
Instructions
-
Line an 8×8-inch square baking pan with parchment paper, leaving an overhang on two sides. Lightly grease the parchment to prevent sticking.
-
In a medium saucepan over low heat, combine peanut butter and sweetened condensed milk. Stir continuously until smooth and fully blended. Remove from heat and stir in vanilla extract and salt.
-
While the mixture is warm, fold in the white chocolate chips until fully melted and incorporated, creating a creamy texture.
-
Gradually fold in the Rice Krispies cereal, coating each piece evenly. Be gentle to maintain the crunch.
-
If desired, fold in chopped peanuts for added texture and flavor.
-
Pour the mixture into the prepared pan and press down evenly using a spatula or back of a spoon. Smooth the top for an even surface.
-
Refrigerate for at least 2 hours, or until firm. For faster setting, place in the freezer for 30–40 minutes.
-
Lift the fudge from the pan using the parchment overhang. Slice into squares or rectangles and serve. Store leftovers in an airtight container in the refrigerator for up to a week.
Notes
-
Use creamy peanut butter for the smoothest texture.
-
Press the mixture firmly into the pan to help the fudge set evenly and slice neatly.
-
Customize with mini chocolate chips, Nutella swirls, or colored sprinkles for festive occasions.
-
Store in the fridge for up to a week or freeze for longer storage.
- Prep Time: 15 minutes
- Cook Time: 10 minutes