There are certain dishes that feel like a warm invitation—meals that instantly lift the mood and bring everyone to the table with anticipation. Honey Sesame Chicken is one of those comforting classics, perfect for a relaxed family dinner, a weekend treat, or a special evening when you want something indulgent yet simple to prepare. The balance of golden crispiness, gentle sweetness, and savory depth makes this dish universally loved across ages and tastes.
The inspiration for this recipe comes from the joy of recreating takeout-style favorites at home, where freshness and quality ingredients make all the difference. Over the years, Honey Sesame Chicken has become a go-to comfort dish in many households, often associated with shared meals, laughter, and that irresistible moment when the sauce clings perfectly to each crispy bite. This version focuses on ease, consistency, and bold flavor—delivering restaurant-style satisfaction without complicated steps.
Why This Honey Sesame Chicken Is Truly Special
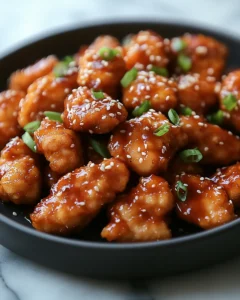
What sets this Honey Sesame Chicken apart is its carefully layered texture and flavor. The chicken is coated in a light batter that fries up crisp without feeling heavy. The sauce blends natural sweetness from honey with soy sauce and toasted sesame oil, creating a glossy finish that’s rich but balanced.
This recipe is approachable for beginners yet rewarding for experienced home cooks. It uses pantry-friendly ingredients, straightforward techniques, and adaptable steps that fit into busy schedules. Best of all, it delivers consistent results every time, making it a dependable favorite you’ll return to again and again.
Ingredients Breakdown and Measurements
For the Crispy Chicken
-
1½ pounds boneless, skinless chicken breast, cut into 1-inch pieces
-
1 cup cornstarch
-
½ cup all-purpose flour
-
1 teaspoon baking powder
-
1 teaspoon salt
-
½ teaspoon ground black pepper
-
2 large eggs
-
¼ cup cold water
-
Vegetable oil, for frying
For the Honey Sesame Sauce
-
½ cup honey
-
⅓ cup low-sodium soy sauce
-
¼ cup ketchup
-
2 tablespoons rice vinegar
-
1 tablespoon sesame oil
-
2 teaspoons cornstarch
-
2 tablespoons water
For Garnish
-
1 tablespoon sesame seeds
-
2 green onions, thinly sliced
Serving Suggestions and Pairings
Honey Sesame Chicken pairs beautifully with steamed jasmine rice, fried rice, or fluffy white rice that absorbs the sauce. For a balanced meal, serve alongside sautéed broccoli, snow peas, or stir-fried bell peppers. The crisp chicken and sticky sauce also work well wrapped in lettuce cups for a lighter presentation.
This dish transitions effortlessly from casual weeknight dinner to a centerpiece for gatherings, making it as versatile as it is satisfying.
Tips for Extra Crispiness
-
Use cold water in the batter to create a lighter, crunchier coating.
-
Fry in small batches to maintain oil temperature.
-
Allow fried chicken to rest briefly before tossing in sauce to preserve texture.
-
Toss gently and serve immediately for best results.
Frequently Asked Questions
Can I use chicken thighs instead of chicken breast?
Yes, boneless, skinless chicken thighs work very well in this recipe. They tend to be slightly juicier and richer in flavor. When using thighs, cut them into uniform pieces to ensure even cooking. Frying time may be slightly longer, but the overall process remains the same. Many cooks enjoy the extra tenderness that thighs bring to the dish, especially when coated in the honey sesame sauce.
How do I prevent the chicken from becoming soggy?
The key is timing. Always fry the chicken until fully crisp and let excess oil drain properly. When combining with sauce, do so over low heat and toss gently just until coated. Avoid letting the chicken sit in sauce for too long before serving. Serving immediately helps preserve that satisfying crunch.
Is this recipe suitable for meal prep?
Honey Sesame Chicken can be prepared ahead, but for best texture, store the fried chicken and sauce separately. Reheat the chicken in an oven or air fryer to restore crispiness, then warm the sauce gently on the stovetop before combining. This method ensures the chicken retains its crunch while still delivering full flavor.
Can I adjust the sweetness of the sauce?
Absolutely. If you prefer a less sweet sauce, reduce the honey by two tablespoons and add a splash of water or additional soy sauce. For a sweeter profile, increase honey slightly. The recipe is flexible and easy to tailor to personal taste without affecting the overall balance.
Why Homemade Honey Sesame Chicken Is Worth It
Making Honey Sesame Chicken at home allows you to control every element—from ingredient quality to seasoning balance. Unlike takeout versions, this recipe avoids excessive oil and overpowering sweetness, focusing instead on harmony between crisp texture and savory-sweet flavor.
Cooking this dish also offers a sense of accomplishment. Watching simple ingredients transform into a glossy, aromatic meal is deeply satisfying. It’s a reminder that restaurant-quality dishes are achievable in a home kitchen with a little care and attention.
Final Thoughts
Honey Sesame Chicken holds a special place in the world of comfort food because it blends familiarity with excitement. Each bite delivers crunch, warmth, and sweetness in a way that feels indulgent yet comforting. This recipe captures that magic while keeping the process approachable and enjoyable.
What makes this dish truly memorable is its ability to bring people together. Whether served at a family dinner, shared during a casual gathering, or enjoyed as a quiet personal treat, it creates moments worth savoring. The aroma alone invites conversation, and the flavor keeps everyone reaching for just one more bite.
By mastering this recipe, you add a reliable favorite to your cooking repertoire—one that adapts to different occasions and preferences without losing its charm. The balance of textures, the sheen of the sauce, and the gentle nuttiness of sesame seeds all work together to create a dish that feels complete.
This Honey Sesame Chicken is more than just a meal; it’s an experience rooted in comfort, flavor, and the joy of homemade cooking. Once you try it, it’s likely to become a repeat request and a trusted recipe you’ll be proud to share.
Print
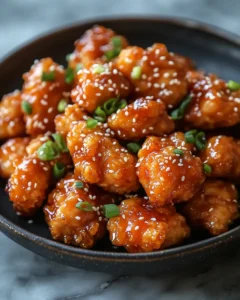
Irresistible Easy Honey Sesame Chicken Crispy Sweet Magic
- Total Time: 40 minutes
- Yield: 4 servings 1x
Description
A golden, crispy chicken dish coated in a glossy honey sesame sauce that balances sweetness and savory depth, perfect for an easy homemade favorite.
Ingredients
-
1½ pounds boneless, skinless chicken breast, cut into 1-inch pieces
-
1 cup cornstarch
-
½ cup all-purpose flour
-
1 teaspoon baking powder
-
1 teaspoon salt
-
½ teaspoon ground black pepper
-
2 large eggs
-
¼ cup cold water
-
Vegetable oil, for frying
-
½ cup honey
-
⅓ cup low-sodium soy sauce
-
¼ cup ketchup
-
2 tablespoons rice vinegar
-
1 tablespoon sesame oil
-
2 teaspoons cornstarch
-
2 tablespoons water
-
1 tablespoon sesame seeds
-
2 green onions, sliced
Instructions
-
Pat chicken dry and prepare batter by mixing dry ingredients in one bowl and eggs with water in another.
-
Coat chicken in egg mixture, then dredge in dry mixture until fully covered.
-
Heat oil to 350°F and fry chicken in batches for 4–5 minutes until golden and crisp. Drain well.
-
In a saucepan, combine honey, soy sauce, ketchup, rice vinegar, and sesame oil.
-
Add cornstarch slurry and simmer until thickened.
-
Toss fried chicken with warm sauce until evenly coated.
-
Garnish with sesame seeds and green onions before serving.
Notes
For best texture, serve immediately after tossing with sauce. Store leftovers with sauce and chicken separated to maintain crispiness when reheating.
- Prep Time: 20 minutes
- Cook Time: 20 minutes