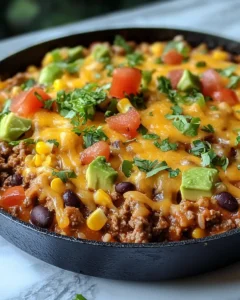
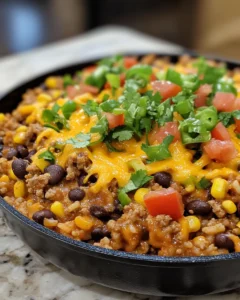
There’s something truly comforting about a skillet dinner that brings everyone together around the table. This Loaded Cheesy Beef Burrito Skillet is one of those recipes that transforms an ordinary weeknight into a warm, satisfying meal you’ll crave again and again. Picture juicy seasoned ground beef simmering with hearty rice, beans, and melty cheese — all in one pan. It’s the perfect recipe for busy evenings when you want something filling, flavorful, and easy to clean up afterward.
Inspired by classic Mexican flavors and the beloved burrito, this skillet version captures everything we love about a restaurant-style burrito but makes it simple enough for home cooks. No rolling, no fuss — just layers of bold, cheesy goodness you can scoop straight from the pan. Whether it’s a family dinner, a casual get-together, or a cozy weekend meal, this dish delivers comfort and satisfaction in every bite.
Ingredients
-
1 pound ground beef (lean preferred)
-
1 tablespoon olive oil (if needed)
-
1 small onion, finely chopped
-
3 garlic cloves, minced
-
1 red bell pepper, diced
-
1 green bell pepper, diced
-
1 can (15 ounces) black beans, drained and rinsed
-
1 can (14.5 ounces) diced tomatoes with green chilies
-
1 cup corn kernels (fresh, canned, or frozen)
-
1 cup uncooked white rice
-
2 cups beef broth (low sodium)
-
1 teaspoon chili powder
-
1 teaspoon ground cumin
-
½ teaspoon smoked paprika
-
½ teaspoon garlic powder
-
½ teaspoon onion powder
-
Salt and pepper to taste
-
1 ½ cups shredded cheddar cheese
-
1 cup shredded Monterey Jack cheese
-
½ cup sour cream (for serving)
-
¼ cup chopped fresh cilantro (for garnish)
-
1 avocado, diced (optional)
-
1 lime, cut into wedges (for serving)
Directions
1. Brown the Beef
Heat a large skillet over medium-high heat. Add ground beef and cook until browned, breaking it apart with a spatula as it cooks. If your beef releases excess grease, drain it carefully, then return it to the skillet.
2. Sauté the Aromatics
Add chopped onion, minced garlic, and both bell peppers to the skillet. Cook for 3–4 minutes until softened and fragrant. This step builds the flavor base for your burrito skillet, infusing every layer with savory goodness.
3. Season the Mixture
Stir in chili powder, cumin, smoked paprika, garlic powder, onion powder, salt, and pepper. Let the spices bloom in the heat for about 30 seconds to intensify their aroma before adding the remaining ingredients.
4. Add the Rice and Vegetables
Pour in the uncooked rice, stirring well to coat it in the beef and spices. Then add black beans, diced tomatoes with green chilies, corn, and beef broth. Stir to combine everything evenly.
5. Simmer Until Tender
Bring the mixture to a light boil, then reduce heat to low. Cover the skillet with a tight-fitting lid and let it simmer for about 18–20 minutes, or until the rice is cooked and has absorbed most of the liquid. Stir occasionally to prevent sticking and ensure even cooking.
6. Melt the Cheese
Once the rice is tender and the mixture is thick, sprinkle both cheeses evenly over the top. Cover again for 2–3 minutes until the cheese melts into a gooey, irresistible layer.
7. Serve and Garnish
Remove from heat and let the skillet rest for 5 minutes. Top with chopped cilantro, diced avocado, and a dollop of sour cream. Serve hot with lime wedges for a burst of fresh flavor.
Prep Time
15 minutes
Cook Time
25 minutes
Total Time
40 minutes
Yield
Serves 4–6
Notes
-
Rice Type: Use long-grain white rice for the best texture. Brown rice can work too, but you’ll need to increase the cooking time and add more broth.
-
Cheese Choices: Feel free to swap cheddar or Monterey Jack for pepper jack or Colby for an extra kick.
-
Make It Ahead: You can prepare the beef and vegetables ahead of time and refrigerate them. When ready, add rice and broth and simmer fresh.
-
Toppings: Other great toppings include diced jalapeños, shredded lettuce, chopped tomatoes, or even crushed tortilla chips for crunch.
-
Storage: Store leftovers in an airtight container in the fridge for up to 3 days. Reheat in a skillet or microwave until hot.
Why You’ll Love This Loaded Cheesy Beef Burrito Skillet
This recipe perfectly captures the essence of a hearty burrito while saving you time and effort. It’s not just a quick dinner; it’s a one-pan wonder that satisfies cravings for something cheesy, spicy, and comforting.
Here’s why it stands out:
-
One-Pan Convenience: Everything cooks in one skillet — less cleanup, more flavor.
-
Customizable Ingredients: Add your favorite burrito fillings or adjust the spice level to your liking.
-
Perfect for Families: The flavors are familiar and loved by both kids and adults.
-
Budget-Friendly: Made with simple pantry staples that stretch easily to feed a crowd.
-
Versatile: Serve it as-is, stuff it into tortillas for burritos, or scoop it over chips for a quick nacho-style meal.
Flavor Profile and Texture
This skillet has a bold and layered flavor that comes from combining seasoned ground beef with sweet bell peppers, creamy cheese, and zesty tomatoes. The rice absorbs all the spices and broth, becoming tender and infused with rich flavor. Each bite delivers a satisfying mix of textures — from the chewy rice and soft beans to the gooey melted cheese on top.
The subtle heat from the chili powder and cumin gives the dish a comforting warmth, while the lime adds a touch of brightness to balance it all out. It’s comfort food at its finest — familiar yet full of life.
How to Customize Your Burrito Skillet
One of the best things about this recipe is its flexibility. You can adapt it to your tastes, dietary needs, or whatever you have in your pantry.
1. Add More Veggies:
Enhance the nutrition and flavor by adding diced zucchini, spinach, or mushrooms. Stir them in while cooking the onions and peppers.
2. Swap the Rice:
If you prefer a lower-carb option, replace the rice with cooked cauliflower rice. Add it after the beef is cooked and reduce the broth amount by half.
3. Try Different Beans:
Black beans give a classic burrito feel, but pinto beans or kidney beans also work well.
4. Adjust the Spice:
For a milder dish, reduce the chili powder. For extra heat, toss in chopped jalapeños or a pinch of cayenne pepper.
5. Make It Creamier:
Add a few tablespoons of cream cheese or a splash of heavy cream before topping with cheese for a luxuriously creamy version.
6. Turn It Into Burritos:
Spoon the filling into flour tortillas, roll them up, and top with more cheese and salsa. Bake until bubbly for a baked burrito casserole twist.
Tips for Perfect Results
-
Toast the Rice: Before adding the broth, lightly toast the rice in the beef mixture for an extra nutty flavor.
-
Use a Large Skillet: A 12-inch skillet gives enough space for even cooking and prevents overflow.
-
Don’t Rush the Simmering: Allowing the rice to cook slowly ensures it absorbs all the rich flavors without becoming mushy.
-
Let It Rest: After cooking, letting the skillet rest for a few minutes helps everything set and makes serving easier.
-
Layer the Cheese: For ultimate cheesiness, stir half the cheese into the mixture before adding the final layer on top.
Perfect Pairings
Pairing this skillet with the right sides or toppings can take it from great to unforgettable.
1. Fresh Side Salad:
A crisp green salad with lime vinaigrette balances the rich, cheesy flavors of the skillet.
2. Tortilla Chips and Salsa:
Add crunch by serving with tortilla chips for scooping.
3. Mexican Street Corn (Elote):
Grilled corn with a touch of lime and cheese complements this dish perfectly.
4. Cilantro-Lime Rice:
If you’re serving a crowd, double up on rice with a fresh cilantro-lime version for variety.
5. Guacamole or Pico de Gallo:
These fresh toppings brighten every bite and add a refreshing contrast.
Storing and Reheating
This skillet stores beautifully, making it a great meal prep option for busy weeks.
To Store:
Let the dish cool completely, then transfer to airtight containers. Refrigerate for up to 3 days.
To Reheat:
Reheat individual portions in the microwave for 1–2 minutes, or warm the entire skillet on the stove over medium heat with a splash of broth or water to loosen it up.
To Freeze:
Freeze in portions for up to 2 months. Thaw overnight in the refrigerator before reheating.
Making It Healthier
While indulgent, you can easily make this recipe lighter without losing flavor.
-
Use lean ground beef (90% or higher) to reduce fat.
-
Replace half the rice with cauliflower rice for fewer carbs.
-
Use reduced-fat cheese or less cheese if preferred.
-
Swap sour cream for plain Greek yogurt as a protein-rich topping.
-
Load up on extra veggies for more fiber and nutrients.
Frequently Asked Questions
1. Can I make this burrito skillet with chicken or turkey instead of beef?
Absolutely! Ground chicken or turkey works well as a leaner alternative. Just season generously since these meats have a milder flavor than beef.
2. My rice isn’t cooking all the way — what should I do?
If the rice is still a bit firm after 20 minutes, add another ¼ cup of broth or water, cover, and simmer for another 5 minutes until tender.
3. Can I make it in advance?
Yes. Prepare everything up to the cheese-melting step. Cover and refrigerate. When ready to serve, reheat on low heat and add fresh cheese on top.
4. What’s the best cheese to use?
Cheddar and Monterey Jack create a rich, gooey texture, but you can also use mozzarella or pepper jack for a spicy twist.

Loaded Cheesy Beef Burrito Skillet Recipe
- Total Time: 40 minutes
- Yield: 4–6 servings 1x
Description
This Loaded Cheesy Beef Burrito Skillet brings all the flavors of your favorite restaurant-style burrito straight to your table — no rolling or wrapping required. Made in one pan, it’s packed with seasoned ground beef, rice, beans, peppers, and plenty of melted cheese. Perfect for a busy weeknight or a cozy weekend dinner, this skillet is hearty, easy to make, and full of bold, comforting flavors that everyone will love.
Ingredients
-
1 pound ground beef (lean preferred)
-
1 tablespoon olive oil (if needed)
-
1 small onion, finely chopped
-
3 garlic cloves, minced
-
1 red bell pepper, diced
-
1 green bell pepper, diced
-
1 can (15 ounces) black beans, drained and rinsed
-
1 can (14.5 ounces) diced tomatoes with green chilies
-
1 cup corn kernels (fresh, canned, or frozen)
-
1 cup uncooked white rice
-
2 cups beef broth (low sodium)
-
1 teaspoon chili powder
-
1 teaspoon ground cumin
-
½ teaspoon smoked paprika
-
½ teaspoon garlic powder
-
½ teaspoon onion powder
-
Salt and pepper to taste
-
1 ½ cups shredded cheddar cheese
-
1 cup shredded Monterey Jack cheese
-
½ cup sour cream (for serving)
-
¼ cup chopped fresh cilantro (for garnish)
-
1 avocado, diced (optional)
-
1 lime, cut into wedges (for serving)
Instructions
-
Heat a large skillet over medium-high heat. Add the ground beef and cook until browned, breaking it apart with a spatula as it cooks. Drain excess grease if necessary.
-
Add the onion, garlic, red bell pepper, and green bell pepper to the skillet. Cook for 3–4 minutes, stirring frequently, until the vegetables are softened.
-
Stir in the chili powder, cumin, smoked paprika, garlic powder, onion powder, salt, and pepper. Let the spices cook for 30 seconds to release their flavor.
-
Add the uncooked rice and stir to coat it evenly in the beef and seasonings. Then add the black beans, diced tomatoes with green chilies, corn, and beef broth. Stir well to combine.
-
Bring the mixture to a light boil, then reduce the heat to low. Cover and simmer for 18–20 minutes, stirring occasionally, until the rice is cooked and has absorbed most of the liquid.
-
Once the rice is tender, sprinkle both cheeses evenly over the top. Cover again for 2–3 minutes, allowing the cheese to melt into a gooey layer.
-
Remove from heat and let rest for 5 minutes. Top with chopped cilantro, diced avocado, and a dollop of sour cream. Serve warm with lime wedges on the side.
Notes
- Prep Time: 15 minutes
- Cook Time: 25 minutes