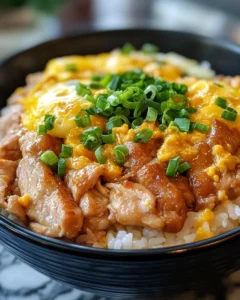
There are certain dishes that feel like a warm embrace, and oyakodon is one of them. Often enjoyed on a quiet evening after a long day, this comforting Japanese rice bowl brings together simple ingredients in a way that feels deeply nourishing. Imagine a gently simmered topping, rich with savory umami, spooned over freshly steamed rice, filling the kitchen with an inviting aroma that signals calm and contentment.
This recipe was inspired by home-style Japanese cooking, where meals are designed to be satisfying without being complicated. Oyakodon has long been a staple in everyday households because it is quick, affordable, and emotionally grounding. It is the kind of dish parents prepare for their families when time is short but care is abundant. With its balance of flavor, texture, and warmth, this savory bowl has earned its reputation as true soul food.
What Makes Oyakodon a Comfort Classic
Oyakodon translates to “parent-and-child rice bowl,” a poetic name that reflects its humble origins and family-centered nature. At its heart, this dish is about harmony. Each ingredient is chosen not to overpower but to support the others. The tender chicken, softly set eggs, lightly sweet and savory sauce, and fluffy rice work together to create a bowl that feels complete.
What makes oyakodon especially comforting is its adaptability. It can be made in a single pan, served immediately, and enjoyed any time of year. Whether eaten for lunch, dinner, or even a late-night meal, it always feels appropriate. The gentle seasoning and satisfying textures make it approachable for all ages, while the umami depth keeps it interesting enough to return to again and again.
Understanding the Umami Profile
Umami is often described as a savory depth that lingers pleasantly on the palate, and oyakodon delivers this quality beautifully. The sauce is typically built from soy sauce, a touch of sweetness, and aromatics like onion. As these ingredients simmer together, they create a balanced base that enhances the natural flavor of the chicken and eggs.
In this version, sweetness comes from sugar and an alcohol-free sweet rice seasoning, which mimics the traditional flavor without introducing alcohol. This ensures the dish remains family-friendly while still achieving that signature savory-sweet profile. The eggs gently absorb the sauce, becoming custard-like and rich, while the rice soaks up every drop, making each bite deeply satisfying.
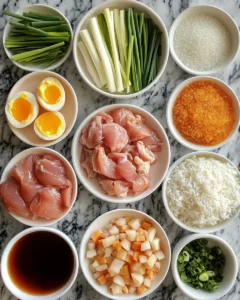
Ingredients You Will Need
For the Oyakodon:
-
1 tablespoon vegetable oil
-
1 medium onion, thinly sliced
-
250 g boneless, skinless chicken thighs, cut into bite-sized pieces
-
120 ml water
-
3 tablespoons soy sauce
-
1 tablespoon sugar
-
1 tablespoon alcohol-free sweet rice seasoning
-
3 large eggs, lightly beaten
-
2 cups cooked short-grain rice
-
1 green onion, finely sliced (for garnish)
Each ingredient plays a role in building layers of flavor while keeping the dish straightforward and accessible.
Serving Suggestions and Variations
Oyakodon is traditionally served on its own, but it pairs well with light side dishes such as steamed vegetables or a simple cucumber salad. If you enjoy a bit of freshness, a small bowl of lightly dressed greens can balance the richness of the eggs.
You can also adjust the texture of the eggs to your preference. Some prefer them just barely set and creamy, while others enjoy a firmer finish. The key is gentle heat and patience, allowing the eggs to cook softly without becoming rubbery.
Frequently Asked Questions
Can I use chicken breast instead of thighs?
Yes, chicken breast can be used, but it will produce a slightly different result. Chicken thighs are preferred because they remain tender and juicy during simmering. If using breast meat, slice it thinly and reduce the cooking time slightly to prevent dryness. Adding the chicken later in the process can also help preserve moisture.
How do I achieve the perfect egg texture?
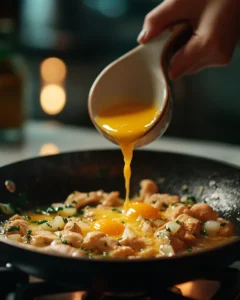
The signature texture of oyakodon lies in softly cooked eggs. To achieve this, keep the heat at medium-low when adding the eggs. Pour them in slowly and avoid stirring. Covering the pan allows gentle steam to set the eggs evenly. Remove from heat while the eggs are still slightly glossy, as they will continue cooking from residual heat.
Is oyakodon suitable for meal prep?
Oyakodon is best enjoyed fresh, as the eggs can change texture when reheated. However, you can prepare the chicken and onion mixture ahead of time and store it in the refrigerator for up to two days. When ready to eat, reheat gently and add freshly beaten eggs just before serving for the best result.
What type of rice works best for this recipe?
Short-grain rice is ideal because of its slightly sticky texture, which helps hold the topping in place. Medium-grain rice can also work if short-grain is unavailable. Avoid long-grain varieties, as they tend to be too dry and separate, which can detract from the traditional experience of the dish.
Why This Dish Resonates Across Generations
Oyakodon has remained popular for generations because it reflects the essence of home cooking. It does not rely on rare ingredients or complex techniques. Instead, it focuses on balance, care, and timing. The dish is forgiving, making it perfect for beginner cooks, yet nuanced enough to satisfy experienced ones.
The act of preparing oyakodon is calming in itself. From slicing onions to gently pouring the eggs, each step encourages mindfulness. It is a reminder that good food does not have to be elaborate to be meaningful. Sometimes, the simplest meals are the ones that stay with us the longest.
Final Thoughts
Savory Japanese oyakodon is more than just a rice bowl; it is a reflection of comfort, tradition, and thoughtful cooking. Its enduring appeal comes from its ability to satisfy both the body and the spirit. With minimal ingredients and a straightforward process, it proves that deeply flavorful food can be made at home without stress or excess.
This dish invites you to slow down and enjoy the process of cooking. As the sauce simmers and the eggs gently set, the kitchen fills with a reassuring aroma that signals nourishment ahead. It is the kind of meal that encourages you to sit down, take a breath, and savor each bite.
Whether you are exploring Japanese home cooking for the first time or returning to a familiar favorite, this oyakodon recipe offers reliability and warmth. It is adaptable, comforting, and endlessly satisfying. Once you try it, it may become one of those recipes you return to whenever you need a sense of grounding and simple joy in a bowl.
Print
Savory Japanese Oyakodon: Umami Soul Food
- Total Time: 25 minutes
- Yield: 2 servings 1x
Description
A comforting Japanese rice bowl made with tender chicken, softly set eggs, and a savory-sweet sauce served over warm rice.
Ingredients
-
1 tablespoon vegetable oil
-
1 medium onion, thinly sliced
-
250 g boneless, skinless chicken thighs, cut into bite-sized pieces
-
120 ml water
-
3 tablespoons soy sauce
-
1 tablespoon sugar
-
1 tablespoon alcohol-free sweet rice seasoning
-
3 large eggs, lightly beaten
-
2 cups cooked short-grain rice
-
1 green onion, finely sliced
Instructions
-
Heat oil in a skillet over medium heat and cook onion until soft.
-
Add chicken and cook until lightly opaque.
-
Stir in water, soy sauce, sugar, and sweet rice seasoning and simmer gently.
-
Pour beaten eggs over the mixture, cover, and cook until softly set.
-
Serve over warm rice and garnish with green onion.
Notes
For best results, serve immediately while the eggs are tender and the rice is hot. Adjust seasoning slightly to taste if needed.
- Prep Time: 10 minutes
- Cook Time: 15 minutes