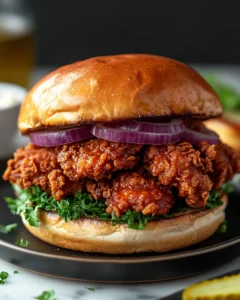
There are certain meals that instantly bring people together, and a spicy crispy fried chicken sandwich is one of them. It’s the kind of food you crave on a relaxed weekend afternoon, during a game night with friends, or when you want something indulgent and comforting after a long day. This sandwich has earned its obsession-worthy status because it delivers everything in one bite: crunch, heat, juiciness, and bold flavor.
The inspiration behind this recipe comes from classic Southern fried chicken traditions paired with modern street-food flair. Over time, cooks began layering crispy chicken with spicy sauces, creamy slaws, and buttery buns, turning a simple sandwich into a full experience. This version is carefully balanced—fiery but not overwhelming, crispy without being greasy, and satisfying enough to feel like a treat worth savoring.
Why This Spicy Fried Chicken Sandwich Is So Popular
What sets this sandwich apart from ordinary fried chicken is the contrast of textures and flavors. The exterior is ultra-crispy, thanks to a well-seasoned coating, while the inside stays tender and juicy. The spice level wakes up your taste buds, and the sauce adds richness that ties everything together.
Another reason for its popularity is versatility. You can dress it up with crunchy slaw, keep it simple with pickles, or add extra heat with more spice. It feels familiar yet exciting, which is exactly why so many people keep coming back for another bite.
Ingredients You’ll Need
For the Chicken Marinade
-
4 boneless, skinless chicken thighs (about 680 g / 1.5 lb)
-
2 cups (480 ml) buttermilk
-
1 tablespoon hot chili paste or chili sauce
-
1 teaspoon salt
-
1 teaspoon garlic powder
-
1 teaspoon paprika
For the Crispy Coating
-
1 ½ cups (190 g) all-purpose flour
-
½ cup (65 g) cornstarch
-
1 teaspoon baking powder
-
1 teaspoon paprika
-
1 teaspoon chili powder
-
½ teaspoon cayenne pepper (adjust to taste)
-
1 teaspoon salt
-
½ teaspoon black pepper
For Frying
-
Vegetable oil, enough for deep frying (about 1 liter / 4 cups)
For the Spicy Sauce
-
½ cup (120 g) mayonnaise
-
2 tablespoons hot chili sauce
-
1 tablespoon honey
-
1 teaspoon garlic powder
-
1 teaspoon lemon juice
For Assembly
-
4 soft sandwich buns
-
Dill pickle slices
-
Optional: shredded lettuce or coleslaw

Tips for Maximum Crispiness
-
Let the coated chicken rest for 5 minutes before frying to help the coating adhere.
-
Maintain consistent oil temperature to avoid soggy chicken.
-
Use chicken thighs instead of breasts for juicier results.
Frequently Asked Questions
1. How spicy is this fried chicken sandwich?
This sandwich has a noticeable kick, but it’s designed to be balanced rather than overpowering. The heat mainly comes from the chili paste in the marinade, cayenne pepper in the coating, and the spicy sauce. If you’re sensitive to spice, you can reduce the cayenne and use a milder chili sauce. On the other hand, spice lovers can add extra chili powder or a dash of hot sauce to the sauce for more intensity.
2. Can I make this sandwich ahead of time?
While the chicken is best enjoyed fresh for maximum crispiness, you can prepare parts of the recipe in advance. The chicken can be marinated overnight, and the sauce can be mixed up to two days ahead and stored in the refrigerator. When ready to serve, fry the chicken fresh and assemble the sandwiches just before eating for the best texture and flavor.
3. What’s the best oil for frying the chicken?
A neutral oil with a high smoke point works best. Vegetable oil, canola oil, or sunflower oil are all excellent choices. These oils allow the spices to shine without adding unwanted flavors and help achieve that signature golden crust.
4. Can I bake or air-fry the chicken instead of deep frying?
Yes, although the texture will be slightly different. For baking, place coated chicken on a wire rack over a baking sheet and bake at 220°C (425°F) for about 25–30 minutes, flipping halfway. For air frying, cook at 200°C (400°F) for 14–16 minutes, turning once. While deep frying gives the crispiest result, these methods still produce a delicious sandwich with less oil.
Serving Suggestions
This spicy crispy fried chicken sandwich pairs perfectly with classic sides like seasoned fries, potato wedges, or a simple green salad. For a refreshing contrast, serve it with a crunchy slaw dressed in a light, tangy dressing. It’s also a fantastic centerpiece for casual gatherings, where everyone can customize their own sandwich with extra toppings and sauces.
Final Thoughts
The reason this spicy crispy fried chicken sandwich has become such a sensation is simple: it delivers pure comfort with bold personality. Every element plays its part, from the tender, flavorful chicken to the crunchy coating and creamy, spicy sauce. It’s indulgent without feeling complicated, and that balance is what makes it so memorable.
What’s especially rewarding about making this sandwich at home is the control you have over every detail. You can adjust the spice level, experiment with toppings, or even swap the bun style to suit your mood. Cooking it yourself also means enjoying it at peak freshness, when the crust is at its crunchiest and the chicken is at its juiciest.
This recipe isn’t just about following steps—it’s about creating a moment. Whether you’re cooking for family, friends, or just yourself, this sandwich brings excitement to the table. Once you take that first bite, it’s easy to understand why everyone is obsessed, and chances are, this will quickly become a go-to favorite in your kitchen.
Print
Spicy Crispy Fried Chicken Sandwich Everyone Is Obsessed With
- Total Time: 40 minutes (plus marinating time)
- Yield: 4 sandwiches 1x
Description
A bold, crunchy, and juicy chicken sandwich layered with spicy sauce and classic toppings, perfect for an indulgent homemade meal.
Ingredients
-
4 boneless, skinless chicken thighs (680 g / 1.5 lb)
-
2 cups (480 ml) buttermilk
-
1 tablespoon hot chili paste
-
1 teaspoon salt
-
1 teaspoon garlic powder
-
1 teaspoon paprika
-
1 ½ cups (190 g) all-purpose flour
-
½ cup (65 g) cornstarch
-
1 teaspoon baking powder
-
1 teaspoon chili powder
-
½ teaspoon cayenne pepper
-
½ teaspoon black pepper
-
Vegetable oil for frying
-
½ cup (120 g) mayonnaise
-
2 tablespoons hot chili sauce
-
1 tablespoon honey
-
1 teaspoon lemon juice
-
4 sandwich buns
-
Pickle slices
Instructions
-
Mix buttermilk, chili paste, salt, garlic powder, and paprika. Marinate chicken for at least 4 hours.
-
Combine flour, cornstarch, baking powder, and spices in a bowl.
-
Dredge marinated chicken in flour mixture.
-
Fry chicken at 175°C (350°F) until golden and cooked through.
-
Mix mayonnaise, chili sauce, honey, and lemon juice to make the sauce.
-
Assemble sandwiches with sauce, chicken, and pickles on toasted buns.
Notes
Adjust spice levels to taste and serve immediately for best crispiness.
- Prep Time: 20 minutes
- Cook Time: 20 minutes