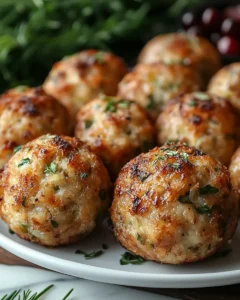
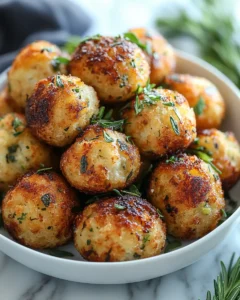
Thanksgiving is a time of warmth, gratitude, and gathering around a table filled with delicious dishes that bring everyone together. Among the many holiday favorites, nothing captures the essence of a festive meal quite like a perfectly seasoned stuffing. Our Herb & Sage Stuffing Balls are a delightful twist on the traditional recipe, designed to be bite-sized, flavorful, and utterly irresistible.
This recipe draws inspiration from the comforting aromas of fresh herbs mingling with savory bread and vegetables, reminiscent of cherished family gatherings. Imagine the soft, golden-brown exterior giving way to a moist, flavorful center infused with sage, thyme, and rosemary—every bite is a celebration of classic Thanksgiving flavors. These stuffing balls are not only visually appealing but also make an excellent side dish for any holiday feast.
Perfect for preparing ahead of time or serving alongside roasted turkey, these stuffing balls combine convenience with the nostalgic charm of homemade comfort food. Whether you’re hosting a large gathering or simply want to add a special touch to your holiday table, this recipe is guaranteed to impress.
Ingredients
-
8 cups of day-old bread, cut into 1-inch cubes
-
1 cup onion, finely chopped
-
1 cup celery, finely chopped
-
3 tablespoons unsalted butter
-
2 cloves garlic, minced
-
1 tablespoon fresh sage, chopped
-
1 teaspoon dried thyme
-
1 teaspoon dried rosemary
-
1 teaspoon salt
-
½ teaspoon black pepper
-
2 large eggs, lightly beaten
-
1 to 1½ cups vegetable or chicken broth
-
2 tablespoons fresh parsley, chopped
Directions
Preheat the Oven and Prepare the Baking Sheet
Before you begin mixing your ingredients, start by preheating your oven to 375°F (190°C). This ensures that your stuffing balls bake evenly from the moment they go in. While the oven is warming, line a large baking sheet with parchment paper. This simple step prevents the stuffing balls from sticking and makes cleanup a breeze. You can also lightly grease the parchment with a small amount of butter or cooking spray for an even crispier exterior. Preparing the oven and baking sheet first sets you up for a smooth cooking process and ensures that every stuffing ball emerges perfectly golden.
Toast the Bread Cubes
For the best texture and flavor, use day-old bread cut into 1-inch cubes. Stale or lightly dried bread absorbs the seasonings and broth better than fresh bread, which can become too soggy. Spread the bread cubes evenly on the prepared baking sheet or in a large oven-safe pan. Bake them for 10–12 minutes, or until they are lightly golden and slightly crisp on the edges. Keep an eye on them to avoid burning, as the bread should retain some softness inside. Toasting the bread adds a nutty depth and ensures your stuffing balls are flavorful and hold together during baking. Once toasted, remove the cubes from the oven and allow them to cool slightly before mixing with other ingredients.
Sauté the Aromatics
While the bread is cooling, prepare the aromatics, which form the flavor base for your stuffing balls. In a large skillet, melt 3 tablespoons of butter over medium heat. Add the finely chopped onion, celery, and minced garlic. Cook for 5–7 minutes, stirring occasionally, until the vegetables become soft, fragrant, and slightly translucent. The gentle cooking releases their natural sweetness and intensifies the flavors of the stuffing balls. Be careful not to brown the garlic too much, as it can turn bitter. Once cooked, remove the skillet from heat and let the mixture cool slightly to avoid wilting the herbs when combined.
Combine the Herbs and Bread
Transfer the toasted bread cubes to a large mixing bowl. Add the sautéed vegetables and season with 1 tablespoon fresh sage, 1 teaspoon dried thyme, 1 teaspoon dried rosemary, 1 teaspoon salt, and ½ teaspoon black pepper. Using a large spoon or your hands, gently mix everything until the bread is evenly coated with herbs and vegetables. This step is crucial for ensuring that every stuffing ball is packed with flavor. For added freshness, sprinkle in 2 tablespoons of chopped parsley. The herbs not only enhance the taste but also give the stuffing balls a vibrant color that is perfect for a holiday table.
Add Eggs and Broth
Next, incorporate the eggs and broth. Lightly beaten eggs act as a binder, helping the mixture hold its shape while baking. Gradually pour in 1 to 1½ cups of vegetable or chicken broth, depending on how moist your bread is. Start with a smaller amount and add more if needed; the mixture should be slightly sticky but not overly wet. Stir gently to combine all ingredients thoroughly. The goal is a mixture that forms cohesive balls while still being tender on the inside. This step allows the flavors to meld together and ensures the stuffing balls maintain a soft, comforting texture.
Form the Stuffing Balls
Once the mixture is ready, it’s time for the fun part: shaping the stuffing balls. Using your hands or a small ice cream scoop, portion out the mixture and roll it into 1½-inch balls. Try to keep them uniform in size for even baking. Place the balls on the prepared baking sheet, leaving about 1 inch of space between each one. This spacing allows the hot air to circulate, creating a golden-brown exterior while keeping the center soft and moist. If the mixture feels too sticky, lightly wet your hands or dust them with flour to make shaping easier.
Bake the Stuffing Balls
Transfer the baking sheet to the preheated oven and bake the stuffing balls for 25–30 minutes. Halfway through baking, carefully turn each ball to ensure they brown evenly on all sides. The balls are done when the exterior is golden brown, slightly crisp, and fragrant with herbs. The interior should remain soft and flavorful. Baking at the right temperature is key to achieving that perfect contrast of textures: a crispy outer layer with a tender, moist center.
Serve Warm
After baking, allow the stuffing balls to rest for a few minutes before serving. This brief cooling period helps them firm up slightly while keeping them tender. Transfer them to a serving dish and arrange them attractively for your holiday table. These Herb & Sage Stuffing Balls are best enjoyed warm, making them a perfect companion to roasted turkey, mashed potatoes, cranberry sauce, or any of your favorite Thanksgiving dishes.
Tips for Perfect Stuffing Balls
-
Use day-old bread: Stale bread absorbs the flavors better and prevents the stuffing from becoming too soggy.
-
Customize your herbs: Fresh herbs elevate the flavor, but dried herbs work in a pinch. Adjust to taste.
-
Moisture control: Add the broth gradually. The mixture should hold together without being overly wet.
-
Make ahead: You can assemble the stuffing balls a day in advance and refrigerate them. Bake just before serving for convenience.
Variations to Try
-
Cheesy stuffing balls: Add ½ cup shredded cheddar or Parmesan to the mixture before forming the balls.
-
Nutty crunch: Mix in ¼ cup chopped walnuts or pecans for added texture.
-
Vegetable boost: Incorporate finely diced carrots or mushrooms for extra flavor and color.
-
Gluten-free option: Use gluten-free bread to make this dish suitable for all dietary needs.
Serving Suggestions
These stuffing balls pair beautifully with roasted turkey, mashed potatoes, cranberry sauce, and green beans. They also work well as an appetizer for holiday gatherings or as a side dish for casual fall dinners. For a creative twist, serve them with a drizzle of vegetarian gravy or a sprinkle of fresh herbs for presentation.
Why These Stuffing Balls Are Perfect for Thanksgiving
Thanksgiving is all about creating dishes that bring comfort and joy, and these stuffing balls do exactly that. Their bite-sized form makes them perfect for sharing, and the combination of aromatic herbs, savory vegetables, and tender bread delivers classic holiday flavors in every bite.
Unlike traditional stuffing, these balls are easy to serve, less messy, and visually appealing, making them ideal for buffets or family-style dinners. Plus, they offer flexibility—you can tweak the herbs, add nuts or cheese, and adjust seasonings to suit your personal taste.
Whether you’re an experienced cook or a beginner looking to impress, this recipe offers a simple yet elegant way to elevate your Thanksgiving table.
Pro Tips for Extra Flavor
-
Herb infusion: Lightly toast the dried herbs in butter before mixing them into the bread for deeper flavor.
-
Garlic lovers: Roasting the garlic beforehand adds a sweeter, milder flavor.
-
Presentation matters: Sprinkle fresh parsley or thyme over the baked balls just before serving for a beautiful finish.
-
Texture balance: Mix a combination of crusty and softer bread to achieve a stuffing ball that is moist inside and crisp outside.
Making It a Family Tradition
Stuffing is often one of those recipes passed down through generations. Transforming it into stuffing balls adds a fun and modern twist while preserving the nostalgic taste everyone loves. Kids enjoy handling the mixture and shaping the balls, making it an interactive activity during holiday prep.
Incorporating these into your Thanksgiving menu can become a cherished tradition. Imagine the aroma filling your home, loved ones gathered around, and everyone eagerly reaching for the golden-brown balls—the essence of holiday celebration captured perfectly in a bite-sized form.
Frequently Asked Questions (FAQs)
1. Can I prepare the stuffing balls ahead of time?
Absolutely! You can assemble the balls a day in advance and store them in the refrigerator. When ready to serve, bake them as directed. This makes holiday prep much easier and ensures you spend more time enjoying the meal rather than cooking.
2. Can I freeze the stuffing balls?
Yes! Place the uncooked stuffing balls on a baking sheet and freeze for 2–3 hours until firm. Transfer them to a freezer-safe bag or container. When ready to bake, no need to thaw—just add a few extra minutes to the baking time.
3. Can I make this recipe vegetarian?
Definitely. Use vegetable broth instead of chicken broth, and all other ingredients are naturally vegetarian. These stuffing balls are flavorful and satisfying without any meat.
4. What type of bread works best?
Day-old crusty bread, such as sourdough, French, or whole wheat, works best. It absorbs the flavors without becoming too mushy. Avoid very soft bread, which can make the mixture overly dense.
Thanksgiving Herb & Sage Stuffing Balls Recipe
- Total Time: 55 minutes
- Yield: 24 stuffing balls 1x
Description
Cozy, flavorful, and perfect for holiday gatherings, these bite-sized stuffing balls are infused with fresh herbs and savory vegetables. Crispy on the outside and tender on the inside, they bring the classic taste of Thanksgiving to your table in a fun and shareable way. Ideal for serving alongside roasted turkey, mashed potatoes, or as an appetizer for holiday parties, they are sure to become a favorite tradition.
Ingredients
-
8 cups day-old bread, cut into 1-inch cubes
-
1 cup onion, finely chopped
-
1 cup celery, finely chopped
-
3 tablespoons unsalted butter
-
2 cloves garlic, minced
-
1 tablespoon fresh sage, chopped
-
1 teaspoon dried thyme
-
1 teaspoon dried rosemary
-
1 teaspoon salt
-
½ teaspoon black pepper
-
2 large eggs, lightly beaten
-
1 to 1½ cups vegetable or chicken broth
-
2 tablespoons fresh parsley, chopped
Instructions
-
Preheat the oven to 375°F (190°C) and line a baking sheet with parchment paper.
-
Toast the bread cubes on a baking sheet for 10–12 minutes until lightly golden. Remove and let cool.
-
In a skillet, melt butter over medium heat. Add onion, celery, and garlic, cooking for 5–7 minutes until softened.
-
In a large bowl, combine toasted bread, sautéed vegetables, sage, thyme, rosemary, salt, and pepper. Mix well.
-
Add beaten eggs and gradually stir in broth until mixture holds together but is not too wet. Mix in parsley.
-
Using hands or a scoop, form 1½-inch balls and place on the baking sheet, leaving space between each.
-
Bake for 25–30 minutes, turning halfway, until golden brown and crispy on the outside.
-
Let cool slightly and serve warm alongside your favorite holiday dishes.
Notes
- Prep Time: 20 minutes
- Cook Time: 35 minutes