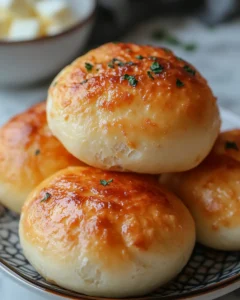
There are certain recipes that feel destined to become instant favorites—the kind that disappear from the plate faster than you can set it down. Cheesy Fried Chicken Buns are exactly that sort of comfort food. Perfect for relaxed weekend lunches, game-day spreads, or those evenings when you want something indulgent yet homemade, these buns strike the ideal balance between crispy, soft, savory, and cheesy.
The inspiration for this recipe comes from street-food culture, where handheld meals rule and textures matter just as much as flavor. Imagine biting into a soft, golden bun only to discover crunchy fried chicken and a warm, stretchy cheese center. It’s the kind of food that brings people together around the table, sparks conversation, and leaves everyone asking for seconds. These buns are not just a meal—they’re an experience worth recreating at home.
Why Cheesy Fried Chicken Buns Are So Popular
Cheesy Fried Chicken Buns combine everything people love in comfort food. The contrast between crispy chicken and pillowy bread creates immediate appeal, while the melted cheese adds richness and indulgence. Unlike traditional fried chicken meals, these buns are portable, tidy, and incredibly versatile.
They work as party snacks, casual dinners, or even lunchbox favorites. Because each bun is individually portioned, they’re easy to serve and even easier to enjoy. Another reason for their popularity is customization—you can adjust the spice level, experiment with different cheeses, or add sauces and herbs to make the recipe your own.
Most importantly, these buns feel special. They’re not something you eat every day, which makes them perfect for moments when you want to impress guests or simply treat yourself to something memorable.
Ingredients You’ll Need
To make these Cheesy Fried Chicken Buns at home, gather the following ingredients. All measurements are included to ensure consistent results.
For the Chicken Filling
-
500 g boneless chicken breast, cut into small chunks
-
1 teaspoon salt
-
1 teaspoon ground black pepper
-
1 teaspoon garlic powder
-
1 teaspoon paprika
-
½ teaspoon onion powder
-
1 tablespoon cornstarch
-
1 large egg
-
120 g all-purpose flour
-
120 g breadcrumbs
For Frying
-
Neutral cooking oil, enough for deep frying
For the Dough
-
500 g all-purpose flour
-
1 tablespoon sugar
-
1 teaspoon salt
-
7 g instant yeast
-
250 ml warm milk
-
50 g unsalted butter, softened
For the Cheese Filling
-
200 g mozzarella cheese, cut into small cubes

Tips for Perfect Cheesy Fried Chicken Buns
-
Seal the dough well: Any gaps can cause the cheese to leak during frying.
-
Control the oil temperature: Medium-low heat ensures the dough cooks through without burning.
-
Use low-moisture mozzarella: This helps achieve that classic cheese pull without excess liquid.
-
Let the buns rest briefly: Allowing them to cool for a few minutes helps the cheese set slightly while staying gooey.
Serving Suggestions
Cheesy Fried Chicken Buns are best served warm, when the cheese is still melty and irresistible. Pair them with simple sides like a fresh salad, crispy fries, or roasted vegetables. They’re also fantastic with dipping sauces such as garlic yogurt sauce, mild chili sauce, or a classic creamy spread.
For gatherings, serve them on a large platter lined with parchment paper. Their golden color and irresistible aroma will draw everyone in immediately.
Frequently Asked Questions
1. Can I prepare Cheesy Fried Chicken Buns in advance?
Yes, you can prepare parts of the recipe ahead of time. The chicken can be fried a day in advance and stored in an airtight container in the refrigerator. The dough can also be prepared and left to rise slowly in the fridge overnight. When you’re ready to assemble, let the dough come back to room temperature, fill it with chicken and cheese, and fry as directed. This makes the recipe much more manageable for busy days or special occasions.
2. What type of cheese works best for this recipe?
Mozzarella is the most popular choice because of its excellent melting quality and mild flavor. However, you can experiment with other cheeses that melt well, such as mild cheddar or a blend designed for melting. Avoid very hard or aged cheeses, as they won’t create the same creamy texture inside the bun. The key is choosing a cheese that complements the chicken without overpowering it.
3. Can these buns be baked instead of fried?
While frying gives the buns their signature golden crust and rich flavor, baking is possible if you prefer a lighter version. Brush the assembled buns generously with oil and bake in a preheated oven at 180°C for about 20–25 minutes, turning once for even color. The texture will be slightly different—less crisp—but still delicious and satisfying.
4. How do I store and reheat leftovers?
Store leftover buns in an airtight container in the refrigerator for up to two days. To reheat, place them in an oven at 170°C for about 10 minutes until warmed through. This method helps maintain the texture better than a microwave, which can make the dough soft. Always reheat until the center is hot for the best experience.
Final Thoughts
Cheesy Fried Chicken Buns are more than just a recipe—they’re a celebration of texture, flavor, and comfort. From the first bite, you experience the crunch of golden dough, the savory satisfaction of well-seasoned chicken, and the indulgent stretch of melted cheese. It’s the kind of dish that instantly earns a place in your regular rotation, not because it’s complicated, but because it’s unforgettable.
What makes this recipe especially rewarding is how approachable it is. With simple ingredients and straightforward steps, home cooks of all levels can achieve impressive results. It’s also a dish that invites creativity. You can tweak the seasoning, adjust the size of the buns, or experiment with different fillings to suit your preferences. Each variation still delivers that same comforting core everyone loves.
These buns are perfect for sharing, yet satisfying enough to enjoy on your own. They turn ordinary moments into something special, whether you’re cooking for family, hosting friends, or simply treating yourself after a long day. Once you’ve made them, it’s easy to understand why everyone is craving Cheesy Fried Chicken Buns—they bring joy, warmth, and flavor together in every single bite.
Print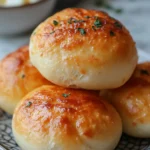
The Cheesy Fried Chicken Buns Everyone’s Craving
- Total Time: 1 hour
- Yield: 8 buns 1x
Description
A comforting handheld dish featuring crispy fried chicken and melted cheese wrapped in soft, golden buns.
Ingredients
-
500 g boneless chicken breast, cut into small chunks
-
1 teaspoon salt
-
1 teaspoon ground black pepper
-
1 teaspoon garlic powder
-
1 teaspoon paprika
-
½ teaspoon onion powder
-
1 tablespoon cornstarch
-
1 large egg
-
120 g all-purpose flour
-
120 g breadcrumbs
-
Neutral cooking oil, for frying
-
500 g all-purpose flour
-
1 tablespoon sugar
-
1 teaspoon salt
-
7 g instant yeast
-
250 ml warm milk
-
50 g unsalted butter, softened
-
200 g mozzarella cheese, cubed
Instructions
-
Season chicken with salt, pepper, garlic powder, paprika, onion powder, cornstarch, and egg.
-
Coat chicken in flour, then breadcrumbs.
-
Fry chicken until golden and cooked through; drain and set aside.
-
Mix flour, sugar, salt, yeast, milk, and butter to form a dough. Knead until smooth and let rise for 1 hour.
-
Divide dough into portions and flatten each piece.
-
Fill with fried chicken and mozzarella, then seal tightly.
-
Fry buns over medium-low heat until golden brown and fully cooked.
Notes
- Prep Time: 30 minutes
- Cook Time: 30 minutes