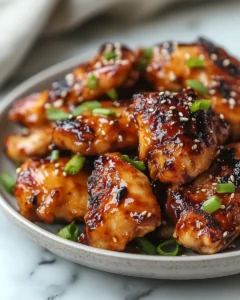
There’s something incredibly comforting about a warm, glossy plate of teriyaki chicken. It’s the kind of dish that feels just right on a busy weeknight when you want something homemade but don’t want to spend hours in the kitchen. This recipe was inspired by those evenings when time is short, energy is low, and the craving for bold, savory flavors is strong. Growing up, teriyaki-style dishes often showed up at family dinners because they were reliable crowd-pleasers, pairing beautifully with rice and simple vegetables.
With the help of the air fryer, this classic favorite becomes even more approachable. The air fryer locks in moisture, creates lightly caramelized edges, and delivers consistent results every time. This version focuses on simplicity, pantry-friendly ingredients, and a homemade teriyaki sauce that’s rich, balanced, and incredibly easy to prepare. Whether you’re cooking for yourself or feeding a family, this recipe is designed to become a go-to staple you’ll return to again and again.
Why This Air Fryer Teriyaki Chicken Works So Well
One of the biggest advantages of using an air fryer for teriyaki chicken is control. Traditional stovetop or oven methods can sometimes lead to uneven cooking or sauce that burns before the chicken is done. The air fryer circulates hot air evenly, allowing the chicken to cook through while the sauce thickens and clings beautifully to every piece.
This recipe also uses a quick homemade teriyaki-style sauce instead of bottled versions. That means you control the sweetness, saltiness, and overall flavor. The sauce comes together in minutes and uses everyday ingredients you likely already have on hand. Combined with the air fryer’s speed, the result is a meal that tastes slow-cooked but is ready surprisingly fast.
Ingredients You’ll Need
For the Chicken
-
1 ½ pounds (680 g) boneless, skinless chicken thighs or chicken breasts
-
1 tablespoon olive oil
-
½ teaspoon salt
-
¼ teaspoon black pepper
For the Teriyaki Sauce
-
½ cup (120 ml) low-sodium soy sauce
-
¼ cup (60 ml) water
-
3 tablespoons honey
-
2 tablespoons brown sugar
-
1 tablespoon rice vinegar
-
1 tablespoon cornstarch
-
2 cloves garlic, minced
-
1 teaspoon fresh ginger, grated
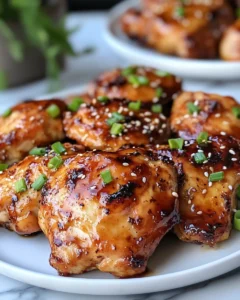
For Garnish (Optional)
-
1 tablespoon sesame seeds
-
2 tablespoons sliced green onions
Every ingredient plays a role. The honey and brown sugar provide gentle sweetness, the soy sauce adds depth, and the ginger and garlic bring that signature aroma that makes teriyaki chicken so irresistible.
Serving Suggestions
This air fryer teriyaki chicken pairs perfectly with fluffy white rice or jasmine rice. For a lighter option, serve it with steamed broccoli, snap peas, or a crisp cucumber salad. It also works wonderfully sliced and tucked into wraps or bowls for meal prep lunches.
Frequently Asked Questions
Can I use chicken breasts instead of thighs?
Yes, chicken breasts work very well in this recipe. Keep in mind that chicken breasts are leaner than thighs, so they can dry out more easily if overcooked. To avoid this, check the internal temperature early and remove the chicken as soon as it reaches 165°F (74°C). You may also want to brush on extra sauce to keep the meat moist and flavorful.
Do I need to marinate the chicken beforehand?
Marinating is not required for this recipe, which is part of what makes it so easy. The teriyaki sauce is brushed on during cooking, allowing it to cling to the chicken and infuse flavor quickly. If you have extra time and want a deeper flavor, you can marinate the chicken in half of the sauce for up to 8 hours in the refrigerator. Just be sure to reserve the remaining sauce for glazing during cooking.
How do I prevent the sauce from burning in the air fryer?
The key is timing. Adding the sauce too early can cause it to burn due to the sugar content. That’s why this recipe calls for brushing the sauce on halfway through cooking. This approach allows the chicken to cook first, then lets the sauce thicken and caramelize gently without burning. Keeping the temperature at 380°F (193°C) also helps prevent scorching.
Can I make this recipe ahead of time?
Absolutely. Air fryer teriyaki chicken stores very well. Once cooked, let it cool completely, then store it in an airtight container in the refrigerator for up to 4 days. Reheat gently in the air fryer at 350°F (177°C) for 3–4 minutes or in a skillet over low heat with a splash of water to loosen the sauce. This makes it an excellent option for meal prep.
Tips for the Best Results
-
Always cook the chicken in a single layer to ensure even airflow.
-
Use a meat thermometer for perfectly cooked chicken every time.
-
If your air fryer runs hot, reduce the temperature slightly and add an extra minute or two of cooking time.
-
Double the sauce recipe if you love extra glaze for serving over rice.
Final Thoughts
This easy air fryer teriyaki chicken is proof that delicious, satisfying meals don’t have to be complicated. With minimal prep, simple ingredients, and a straightforward cooking method, it’s a recipe that fits seamlessly into real life. Whether you’re new to air frying or already rely on it for quick dinners, this dish showcases just how versatile and reliable the appliance can be.
What truly sets this recipe apart is its balance. The sauce is sweet without being overpowering, savory without being too salty, and fragrant thanks to fresh garlic and ginger. The air fryer ensures the chicken stays juicy inside while developing just enough caramelization on the outside to make every bite interesting. It’s the kind of meal that feels comforting yet fresh, familiar yet exciting.
This recipe is also incredibly adaptable. You can adjust the sweetness, add a touch of heat, or pair it with different sides depending on your mood or the season. It works just as well for a quiet dinner at home as it does for sharing with family and friends. Once you make it, you’ll likely find yourself coming back to it whenever you need a reliable, flavorful dinner that everyone enjoys.
If you’re looking for a recipe that delivers maximum flavor with minimal effort, this air fryer teriyaki chicken deserves a permanent spot in your meal rotation. It’s simple, satisfying, and truly one of the easiest ways to enjoy a homemade teriyaki-style dish any night of the week.
Print
The Easiest Air Fryer Teriyaki Chicken You’ll Ever Make
- Total Time: 30 minutes
- Yield: 4 servings 1x
Description
A quick and flavorful air fryer chicken recipe coated in a homemade teriyaki-style sauce that’s perfect for busy weeknights.
Ingredients
-
1 ½ pounds (680 g) boneless, skinless chicken thighs or chicken breasts
-
1 tablespoon olive oil
-
½ teaspoon salt
-
¼ teaspoon black pepper
-
½ cup (120 ml) low-sodium soy sauce
-
¼ cup (60 ml) water
-
3 tablespoons honey
-
2 tablespoons brown sugar
-
1 tablespoon rice vinegar
-
1 tablespoon cornstarch
-
2 cloves garlic, minced
-
1 teaspoon fresh ginger, grated
-
Sesame seeds and sliced green onions for garnish (optional)
Instructions
-
Whisk together soy sauce, water, honey, brown sugar, rice vinegar, cornstarch, garlic, and ginger in a saucepan. Simmer over medium heat until thickened, then set aside.
-
Pat chicken dry, drizzle with olive oil, and season with salt and pepper.
-
Preheat air fryer to 380°F (193°C).
-
Cook chicken for 10 minutes, flip, brush with sauce, and cook 6–8 more minutes until done.
-
Brush with more sauce and cook 2 additional minutes to glaze.
-
Rest briefly, garnish if desired, and serve.
Notes
For extra sauce, double the sauce ingredients. Store leftovers in the refrigerator for up to 4 days and reheat gently for best texture.
- Prep Time: 10 minutes
- Cook Time: 18–20 minutes