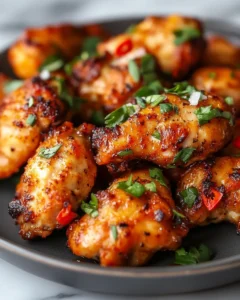
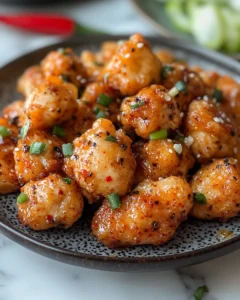
There are certain recipes that quietly become legends — the kind people bookmark, screenshot, and send to friends with a simple message: “You need to try this.” Salt and Pepper Chicken is one of those dishes. It’s the meal you crave on a cozy evening when you want something crispy, savory, and deeply satisfying without spending hours in the kitchen. This recipe is inspired by classic street-style flavors found across Asian home cooking, where simplicity is respected and technique does the heavy lifting.
What makes this dish unforgettable is how such humble ingredients transform into something bold and addictive. Perfectly seasoned chicken, crisp on the outside and juicy on the inside, finished with fragrant garlic, chili, and scallions — it’s comfort food with character. Whether you’re cooking for family, friends, or just yourself, this is the kind of recipe that earns a permanent place in your rotation.
Why This Salt and Pepper Chicken Works So Well
Salt and Pepper Chicken isn’t about complicated sauces or long marinades. The magic lies in balance and texture. The chicken is lightly coated, cooked until golden and crisp, then tossed with aromatics that bloom in heat and perfume the entire dish.
This recipe works because it:
-
Uses simple pantry ingredients
-
Delivers restaurant-quality crispiness at home
-
Is adaptable for weeknight cooking or special occasions
-
Pairs beautifully with rice, noodles, or fresh vegetables
The result is a dish that feels indulgent yet approachable — bold enough to impress, easy enough to repeat.
Ingredients You’ll Need
For the Chicken
-
900 g (2 lb) boneless chicken thighs or chicken breast, cut into bite-sized pieces
-
1 teaspoon fine sea salt
-
1 teaspoon freshly ground black pepper
-
1 teaspoon white pepper
-
1 teaspoon garlic powder
-
1 teaspoon onion powder
-
1 teaspoon paprika
-
2 tablespoons cornstarch
-
2 tablespoons all-purpose flour
-
1 large egg
-
120 ml (½ cup) cold water
For Cooking and Aromatics
-
500 ml (2 cups) neutral oil (such as vegetable or sunflower oil, for frying)
-
5 cloves garlic, finely chopped
-
2 fresh red chilies, thinly sliced (adjust to taste)
-
4 scallions, sliced (white and green parts separated)
For Finishing
-
½ teaspoon flaky sea salt (or to taste)
-
½ teaspoon freshly cracked black pepper
-
Extra sliced scallions for garnish
Step-by-Step Instructions
Prepare the Chicken
Start by patting the chicken pieces completely dry using paper towels. This step is more important than it seems — removing surface moisture allows the seasoning to cling properly and helps the coating turn crisp instead of steamy during frying. Place the chicken into a large mixing bowl and season it evenly with the fine sea salt, black pepper, white pepper, garlic powder, onion powder, and paprika. Take a moment to mix thoroughly, using your hands or a spatula, so every piece is evenly coated. This dry seasoning layer is the foundation of flavor and ensures the chicken tastes seasoned all the way through, not just on the surface.
Let the seasoned chicken rest for about 5 minutes while you prepare the batter ingredients. This short rest allows the seasoning to absorb slightly into the meat, improving overall depth of flavor.
Create the Batter
Once the chicken is seasoned, add the cornstarch and all-purpose flour directly to the bowl. These two ingredients work together to create a light yet crisp coating — cornstarch provides crunch, while flour adds structure. Crack in the egg and pour in the cold water. Stir gently until a thin, pourable batter forms around the chicken. The goal is not a thick coating, but a light cling that barely coats each piece.
If the batter seems too thick, add 1–2 tablespoons of cold water to loosen it. If it’s too thin, sprinkle in a small amount of flour. The correct consistency allows excess batter to drip off when lifted, ensuring a delicate, crispy shell rather than a heavy crust.
Heat the Oil
Pour the neutral oil into a deep pan, wok, or heavy-bottomed pot, making sure there is enough oil to fully submerge the chicken pieces. Heat the oil to 175°C (350°F). Maintaining the correct oil temperature is critical — oil that is too cool will result in greasy chicken, while oil that is too hot can burn the exterior before the chicken cooks through.
To test readiness, drop a small amount of batter into the oil. It should sizzle immediately and float to the surface within seconds. If it sinks without bubbling, the oil needs more time to heat.
Fry the Chicken
Carefully add the chicken pieces to the hot oil in small batches. Avoid overcrowding the pan, as this lowers the oil temperature and prevents proper crisping. Fry each batch for 4–5 minutes, turning occasionally to ensure even browning on all sides.
As the chicken cooks, you’ll notice the coating turning golden and lightly blistered. Once fully cooked and crisp, remove the chicken using a slotted spoon and place it on a wire rack or paper towels to drain excess oil. Repeat with the remaining batches, allowing the oil temperature to return to 175°C (350°F) between each round.
Crisp It Again (Optional but Recommended)
For restaurant-style crunch, perform a second fry. Increase the oil temperature to 190°C (375°F). Return the fried chicken to the oil in batches for 1–2 minutes. This second fry drives out any remaining moisture and creates an ultra-crispy exterior that stays crunchy longer after serving.
Remove the chicken and drain once more. You’ll notice a deeper golden color and a noticeably lighter, crispier texture.
Prepare the Aromatics
In a clean wok or large skillet, add 1 tablespoon of oil and heat over medium heat. Add the chopped garlic, sliced chilies, and the white parts of the scallions. Stir constantly for 30–40 seconds until fragrant. Be careful not to let the garlic brown — it should soften and release aroma without becoming bitter.
This step is fast but essential, as it infuses the oil with flavor that will coat the chicken.
Toss the Chicken
Add the fried chicken to the pan with the aromatics. Sprinkle evenly with flaky sea salt and freshly cracked black pepper. Toss quickly over the heat, ensuring every piece is coated with the fragrant oil, garlic, and chilies. This step should take no more than 30 seconds to prevent the chicken from losing its crispness.
Finish and Serve
Remove the pan from heat and scatter the green parts of the scallions over the chicken. Serve immediately while hot and crisp. This dish is best enjoyed fresh, when the contrast between the crunchy exterior and juicy interior is at its peak.
Serving Suggestions
Salt and Pepper Chicken is incredibly versatile. Serve it with:
-
Steamed jasmine rice
-
Fried rice or garlic noodles
-
Fresh cucumber salad
-
Lightly sautéed vegetables
It also works beautifully as an appetizer or party dish served with toothpicks and lime wedges.
Frequently Asked Questions
1. What cut of chicken works best for Salt and Pepper Chicken?
Chicken thighs are often preferred because they stay juicy even after frying. Their slightly higher fat content helps maintain moisture while delivering rich flavor. Chicken breast works well too, especially if you prefer leaner meat, but it’s important not to overcook it. Cutting the chicken into evenly sized pieces ensures consistent cooking and prevents dryness.
If you’re cooking for a crowd or planning leftovers, thighs tend to reheat better without losing texture. Regardless of the cut, patting the chicken dry before battering is essential for achieving maximum crispiness.
2. Can this recipe be made without deep frying?
Yes, while deep frying produces the crispiest result, this recipe can be adapted. You can shallow-fry the chicken using about 120 ml (½ cup) oil in a wide pan, turning the pieces frequently until golden. An air fryer also works well — cook at 200°C (400°F) for 14–16 minutes, shaking halfway through.
The flavor remains bold and satisfying, though the texture will be slightly different. If using alternative methods, make sure the chicken is not overcrowded so it browns properly instead of steaming.
3. How spicy is Salt and Pepper Chicken?
The spice level is customizable. The base seasoning relies more on peppery warmth than intense heat. Fresh chilies add brightness and mild heat, but you can easily adjust the amount or omit them altogether.
For extra heat, add more chilies or a pinch of chili flakes. For a milder version, remove the seeds from the chilies or substitute with sliced bell peppers for aroma without spice.
4. How do I store and reheat leftovers?
Store leftover Salt and Pepper Chicken in an airtight container in the refrigerator for up to 3 days. To reheat, avoid the microwave if possible, as it softens the coating. Instead, reheat in an oven at 190°C (375°F) for 8–10 minutes or in an air fryer for 5–6 minutes.
This method helps restore crispiness while keeping the chicken tender. Add a small sprinkle of salt and pepper after reheating to refresh the flavors.
Final Thoughts
Salt and Pepper Chicken earns its popularity not because it’s flashy, but because it delivers exactly what people crave: texture, flavor, and comfort in every bite. It’s a dish that feels familiar yet exciting, simple yet unforgettable. Once you make it at home, you’ll understand why so many people save this recipe and come back to it again and again.
This recipe fits seamlessly into busy weeknights and relaxed weekends alike. It doesn’t require special equipment or hard-to-find ingredients, yet the result feels like something you’d proudly serve to guests. The combination of crisp chicken, aromatic garlic, and bold seasoning creates a harmony that never gets old.
Perhaps most importantly, this is a recipe that encourages confidence in the kitchen. It teaches you how small techniques — proper seasoning, correct oil temperature, quick tossing with aromatics — can elevate everyday ingredients into something remarkable. Over time, you may find yourself adjusting the spice, experimenting with sides, or making it your own, and that’s exactly how beloved recipes are born.
If you’re looking for a dependable, crowd-pleasing dish that delivers on flavor every single time, this Salt and Pepper Chicken truly is the one everyone’s saving — and once you try it, you’ll be saving it too.
Print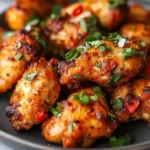
The Salt and Pepper Chicken Recipe Everyone’s Saving
- Total Time: 40 minutes
- Yield: 4 servings 1x
Description
Crispy, savory, and packed with bold flavor, this Salt and Pepper Chicken is a simple yet unforgettable dish perfect for any occasion.
Ingredients
-
900 g (2 lb) boneless chicken thighs or breast, cut into pieces
-
1 teaspoon fine sea salt
-
1 teaspoon black pepper
-
1 teaspoon white pepper
-
1 teaspoon garlic powder
-
1 teaspoon onion powder
-
1 teaspoon paprika
-
2 tablespoons cornstarch
-
2 tablespoons all-purpose flour
-
1 large egg
-
120 ml (½ cup) cold water
-
500 ml (2 cups) neutral oil
-
5 cloves garlic, chopped
-
2 red chilies, sliced
-
4 scallions, sliced
Instructions
-
Season chicken with spices and salt.
-
Mix in cornstarch, flour, egg, and water to form a light batter.
-
Heat oil to 175°C (350°F).
-
Fry chicken in batches until golden and crisp.
-
Optional: Fry again at 190°C (375°F) for extra crunch.
-
Stir-fry garlic, chilies, and scallions in a pan.
-
Toss chicken with aromatics, season, and serve hot.
Notes
For extra crispiness, avoid overcrowding the pan and serve immediately after tossing with aromatics. Adjust spice levels to taste.
- Prep Time: 20 minutes
- Cook Time: 20 minutes