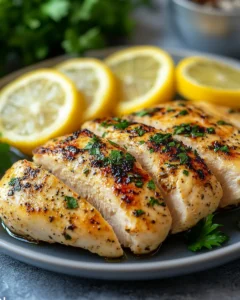
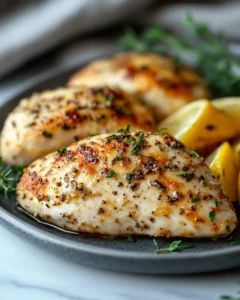
There’s something magical about discovering a recipe that completely changes the way you think about a familiar ingredient. This air fryer chicken breast is one of those rare finds. It’s the kind of dish that fits effortlessly into a busy weeknight yet feels impressive enough to serve to guests. I first perfected this recipe during a season of wanting quick, wholesome meals that didn’t sacrifice texture or flavor. Chicken breast has a reputation for being dry or bland, but the air fryer transforms it into something entirely different. With the right seasoning, timing, and technique, the result is juicy, tender chicken with a lightly crisp exterior. It’s ideal for meal prep, family dinners, or anytime you want a reliable protein that pairs beautifully with almost anything on your plate.
Why the Air Fryer Makes Chicken Breast So Tender
The air fryer works by circulating hot air rapidly around the food, cooking it evenly and locking in moisture. Unlike traditional oven baking, which can dry out lean meats, the air fryer cooks chicken breast quickly at a consistent temperature. This minimizes moisture loss while still creating a lightly golden exterior.
Another key advantage is control. Because air fryers heat up fast and cook efficiently, there’s less guesswork involved. When paired with a simple seasoning blend and a light coating of oil, chicken breasts come out tender from edge to center. This method also eliminates the need for heavy breading or long marinades, making it both time-saving and health-conscious.
Ingredients You’ll Need
For the air fryer chicken breast, you’ll need simple pantry staples that come together to create big flavor:
-
2 boneless, skinless chicken breasts (about 6–7 oz / 170–200 g each)
-
1 tablespoon olive oil (15 ml)
-
1 teaspoon garlic powder (3 g)
-
1 teaspoon paprika (3 g)
-
1/2 teaspoon onion powder (1 g)
-
1/2 teaspoon salt (3 g)
-
1/2 teaspoon black pepper (1 g)
-
1/2 teaspoon dried oregano or Italian seasoning (1 g)
These measurements are carefully balanced to enhance the chicken without overpowering its natural flavor. You can easily adjust spices to suit your taste, but this combination is a reliable starting point.
How to Make Shockingly Tender Air Fryer Chicken Breast
Step 1: Prepare the Chicken
The foundation of a perfectly tender air fryer chicken breast starts with proper preparation. Begin by removing the chicken breasts from their packaging and patting them completely dry using paper towels. This step may seem small, but it plays a major role in the final texture. Excess surface moisture can prevent seasonings from sticking properly and may cause the chicken to steam rather than cook evenly in the air fryer.
Once dry, take a close look at the thickness of each chicken breast. Many chicken breasts are uneven, with one end significantly thicker than the other. To correct this, place the chicken between two pieces of parchment paper or plastic wrap and gently pound the thicker portion using a meat mallet or rolling pin. Aim for an even thickness of about 1 inch (2.5 cm). This step ensures the chicken cooks uniformly, preventing dry edges and undercooked centers. Even thickness is one of the most important secrets to achieving juicy, tender chicken in the air fryer.
Step 2: Season Generously
Seasoning is where flavor is built, and chicken breast benefits greatly from a well-balanced blend of spices. Place the prepared chicken breasts into a medium bowl or directly onto a clean plate. Drizzle them with 1 tablespoon (15 ml) of olive oil, making sure both sides are lightly coated. The oil not only helps the seasonings adhere but also promotes gentle browning during cooking.
Next, evenly sprinkle 1 teaspoon (3 g) garlic powder, 1 teaspoon (3 g) paprika, 1/2 teaspoon (1 g) onion powder, 1/2 teaspoon (3 g) salt, 1/2 teaspoon (1 g) black pepper, and 1/2 teaspoon (1 g) dried oregano or Italian seasoning over the chicken. Use your hands to rub the seasoning mixture into the surface of the meat, pressing lightly so it sticks well. Be sure to coat both sides thoroughly. This step ensures every bite is well-seasoned and flavorful without overpowering the natural taste of the chicken.
Step 3: Preheat the Air Fryer
Preheating the air fryer is an often-overlooked step, but it makes a noticeable difference in texture and moisture retention. Set your air fryer to 380°F (193°C) and allow it to preheat for about 3 minutes. A preheated air fryer begins cooking the chicken immediately when it’s placed inside, which helps seal in juices and prevents the meat from drying out. This quick exposure to consistent heat is one of the reasons air fryer chicken breast can be so tender when done correctly.
Step 4: Air Fry to Perfection
Once preheated, arrange the seasoned chicken breasts in the air fryer basket in a single layer. Make sure there is space between each piece so hot air can circulate freely. Overcrowding the basket can lead to uneven cooking and reduced tenderness.
Cook the chicken at 380°F (193°C) for 9 minutes, then carefully flip each breast using tongs. Continue cooking for an additional 7–9 minutes, depending on the thickness of the chicken. Thicker pieces may need the full cooking time, while thinner ones may be done sooner. The most accurate way to confirm doneness is by using a meat thermometer. The internal temperature should reach 165°F (74°C) at the thickest part of the chicken. This ensures the chicken is fully cooked while remaining juicy.
Step 5: Rest Before Serving
After removing the chicken from the air fryer, place it on a cutting board or plate and let it rest for 5 minutes before slicing or serving. Resting is a crucial final step that allows the juices inside the chicken to redistribute evenly throughout the meat. Cutting into the chicken too soon can cause those juices to escape, resulting in a drier texture.
By allowing the chicken to rest, you’ll notice a dramatic improvement in tenderness and moisture. The result is shockingly tender air fryer chicken breast that’s juicy, flavorful, and perfect for serving on its own or incorporating into a variety of meals.
Serving Ideas and Pairings
This air fryer chicken breast is wonderfully versatile. Slice it over salads, serve it alongside roasted vegetables, or pair it with rice, quinoa, or mashed potatoes. It also works beautifully in wraps, sandwiches, or grain bowls. Because the seasoning is balanced and neutral, it complements a wide range of sauces and sides without clashing.
Tips for Perfect Results Every Time
-
Always use a meat thermometer to avoid overcooking.
-
Let the chicken rest after cooking for maximum juiciness.
-
Avoid overcrowding the air fryer basket to ensure proper air circulation.
-
Adjust cooking time slightly based on the size and thickness of the chicken breasts.
Frequently Asked Questions
1. How do I keep chicken breast from drying out in the air fryer?
The most important factors are temperature, timing, and preparation. Cooking chicken breast at too high a temperature or for too long is the main reason it becomes dry. Air frying at 380°F (193°C) allows the chicken to cook through quickly without losing moisture. Lightly coating the chicken with olive oil (15 ml per two breasts) also helps seal in juices. Another critical step is resting the chicken after cooking. Allowing it to rest for at least 5 minutes lets the internal juices redistribute, which significantly improves tenderness. Finally, pounding the chicken to an even thickness ensures it cooks evenly, preventing thin edges from drying out while thicker parts finish cooking.
2. Can I use frozen chicken breasts in this recipe?
Yes, you can cook frozen chicken breasts in the air fryer, but the results are best when the chicken is thawed first. Frozen chicken requires a longer cooking time and may not absorb seasoning as evenly. If cooking from frozen, add about 5–7 extra minutes to the total cooking time and season halfway through once the surface has thawed. Always check that the internal temperature reaches 165°F (74°C). For the most shockingly tender texture, thawed chicken breasts are strongly recommended.
3. Should I marinate the chicken before air frying?
Marinating is optional for this recipe. Thanks to the air fryer’s ability to retain moisture, a simple oil-and-spice coating is enough to produce juicy, flavorful chicken. However, if you enjoy marinated chicken, you can marinate the breasts for 30 minutes to 8 hours using a mixture that includes oil, herbs, and spices. Avoid acidic marinades for long periods, as they can change the texture of the meat and make it slightly mushy. This recipe is designed for convenience, so skipping the marinade won’t compromise tenderness.
4. How do I store and reheat air fryer chicken breast?
Store leftover chicken breast in an airtight container in the refrigerator for up to 4 days. To reheat, place the chicken back in the air fryer at 350°F (177°C) for 3–5 minutes until warmed through. This method helps retain moisture better than a microwave. You can also slice the chicken cold and use it in salads or wraps. Proper storage and gentle reheating ensure the chicken stays tender and flavorful even after the first day.
Final Thoughts
This air fryer chicken breast proves that simple cooking methods can deliver extraordinary results. What makes this recipe so special is its reliability. It doesn’t rely on complicated steps, hard-to-find ingredients, or long preparation times. Instead, it focuses on understanding how the air fryer works and using that knowledge to achieve consistently tender chicken.
For home cooks who struggle with dry chicken breast, this recipe can be a turning point. It builds confidence and shows that lean proteins don’t have to be boring or unforgiving. The balance of seasoning enhances the natural flavor of the chicken without overwhelming it, making the dish adaptable to countless meals and cuisines.
Another reason this recipe stands out is its practicality. Whether you’re cooking for yourself, feeding a family, or preparing meals ahead of time, this chicken fits seamlessly into your routine. It reheats well, pairs with almost anything, and maintains its texture far better than many traditional cooking methods.
Ultimately, this air fryer chicken breast isn’t just about convenience; it’s about transforming a kitchen staple into something you genuinely look forward to eating. Once you experience how tender and juicy it is, it’s likely to become a permanent part of your weekly rotation.
Print
This Air Fryer Chicken Breast Is Shockingly Tender
- Total Time: 22–25 minutes
- Yield: 2 servings 1x
Description
A simple yet incredibly juicy air fryer chicken breast made with pantry spices and cooked to perfection in minutes.
Ingredients
-
2 boneless, skinless chicken breasts (6–7 oz / 170–200 g each)
-
1 tablespoon olive oil (15 ml)
-
1 teaspoon garlic powder (3 g)
-
1 teaspoon paprika (3 g)
-
1/2 teaspoon onion powder (1 g)
-
1/2 teaspoon salt (3 g)
-
1/2 teaspoon black pepper (1 g)
-
1/2 teaspoon dried oregano or Italian seasoning (1 g)
Instructions
-
Pat chicken breasts dry and pound lightly to even thickness if needed.
-
Coat chicken with olive oil and season evenly on both sides.
-
Preheat air fryer to 380°F (193°C).
-
Cook chicken for 9 minutes, flip, then cook another 7–9 minutes until internal temperature reaches 165°F (74°C).
-
Rest for 5 minutes before serving.
Notes
For best results, avoid overcrowding the air fryer basket and always let the chicken rest before slicing.
- Prep Time: 5 minutes
- Cook Time: 16–18 minutes